

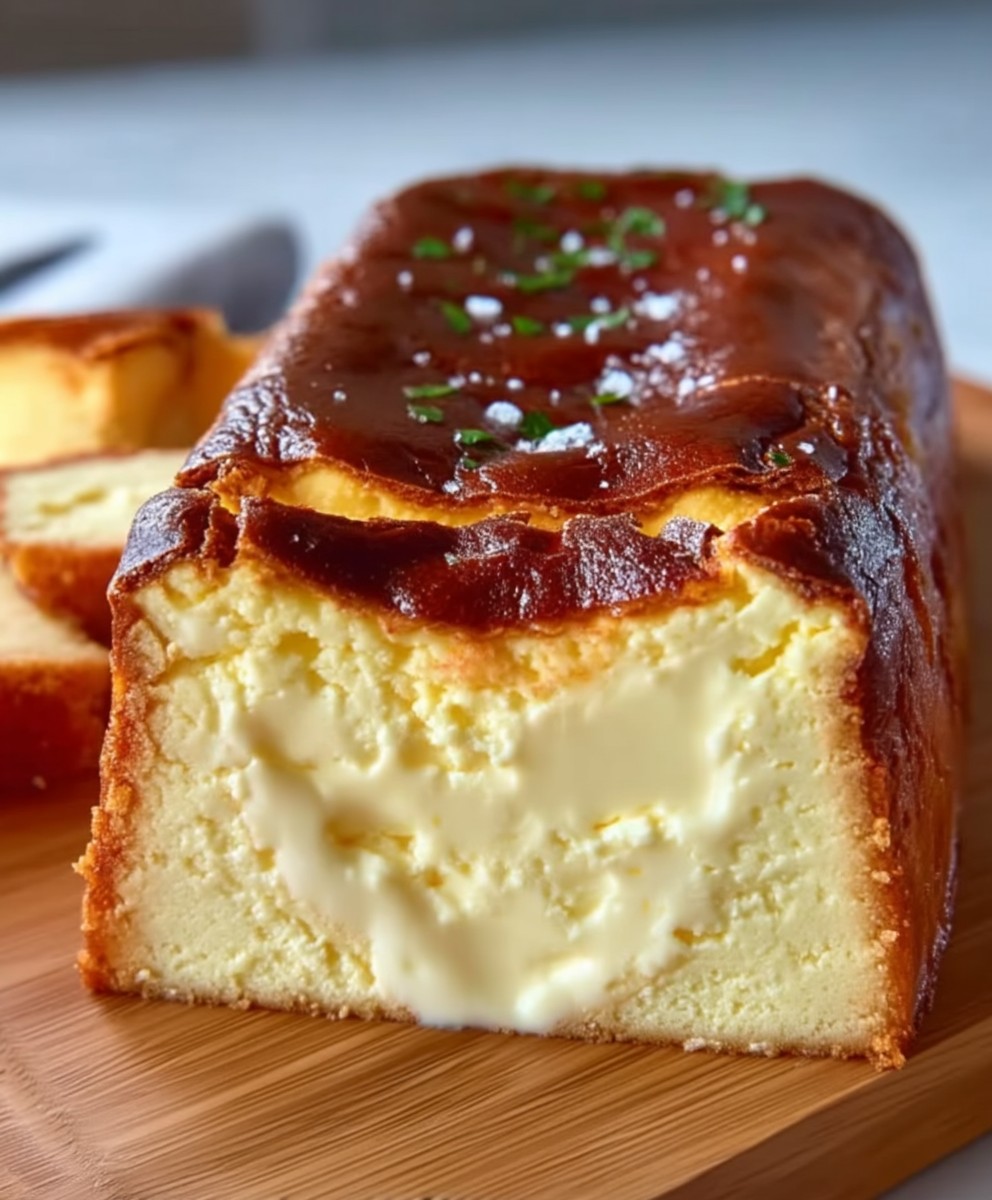
Basque Cheesecake Loaf Pan is a delightful twist on the traditional Basque burnt cheesecake that has taken the culinary world by storm. Originating from the Basque region of Spain, this dessert is known for its creamy texture and slightly charred top, which adds a unique depth of flavor. The beauty of the Basque Cheesecake Loaf Pan lies in its convenience; it’s baked in a loaf pan, making it easier to slice and serve, perfect for gatherings or a cozy night in.
People adore this dish not only for its rich, velvety taste but also for its simplicity. The combination of cream cheese, sugar, and eggs creates a luscious filling that melts in your mouth, while the caramelized exterior offers a satisfying contrast. Whether you’re a seasoned baker or a novice in the kitchen, this recipe is sure to impress your family and friends. Join me as we explore the steps to create this irresistible Basque Cheesecake Loaf Pan that will leave everyone asking for seconds!

Ingredients:
- 2 cups cream cheese, softened
- 1 cup granulated sugar
- 1/2 cup heavy cream
- 3 large eggs
- 1 teaspoon vanilla extract
- 1 tablespoon all-purpose flour
- 1/4 teaspoon salt
- 1 tablespoon lemon juice
- Butter, for greasing the loaf pan
- Parchment paper, for lining the pan
Preparing the Batter
- Preheat the oven: Start by preheating your oven to 400°F (200°C). This high temperature is essential for achieving that signature burnt top of the Basque cheesecake.
- Prepare the loaf pan: Take a standard loaf pan (9×5 inches) and grease it with butter. Then, line the bottom and sides with parchment paper, allowing some overhang. This will help you easily remove the cheesecake once it’s baked.
- Mix the cream cheese: In a large mixing bowl, add the softened cream cheese. Using an electric mixer, beat the cream cheese on medium speed until it’s smooth and creamy, about 2-3 minutes. Make sure there are no lumps for a silky texture.
- Add sugar: Gradually add the granulated sugar to the cream cheese while continuing to mix. Beat until the mixture is well combined and fluffy, approximately 2 more minutes.
- Incorporate the eggs: Add the eggs one at a time, mixing well after each addition. This ensures that each egg is fully incorporated before adding the next, which helps maintain the structure of the cheesecake.
- Mix in the heavy cream: Pour in the heavy cream and vanilla extract. Mix on low speed until just combined. Be careful not to overmix, as this can introduce too much air into the batter.
- Add dry ingredients: Sift the all-purpose flour and salt into the batter. Gently fold these dry ingredients into the mixture using a spatula until just combined. Finally, add the lemon juice and fold it in as well.
Baking the Cheesecake
- Pour the batter: Carefully pour the cheesecake batter into the prepared loaf pan. Use a spatula to smooth the top, ensuring an even surface.
- Bake the cheesecake: Place the loaf pan in the preheated oven and bake for 40-45 minutes. The top should be deeply golden brown, and the center will still be slightly jiggly. This is normal, as it will set as it cools.
- Cool the cheesecake: Once baked, remove the cheesecake from the oven and let it cool in the pan for about 15 minutes. Then, carefully lift it out using the parchment paper overhang and transfer it to a wire rack to cool completely.
Chilling and Serving
- Chill the cheesecake: After the cheesecake has cooled to room temperature, cover it with plastic wrap and refrigerate for at least 4 hours, or preferably overnight. This chilling time allows the flavors to meld and the texture to firm up.
- Slice and serve: Once chilled, use a sharp knife to slice the cheesecake into thick pieces. The texture should be creamy and smooth, with a slightly caramelized top. Serve it plain or with a drizzle of honey or fresh berries for added flavor.
- Store leftovers: If you have any leftovers, store them in an airtight container in the refrigerator for up to 5 days. This cheesecake is just as delicious the next day!
Tips for the Perfect Basque Cheesecake
- Use room temperature ingredients: Make sure your cream cheese, eggs, and heavy cream are at room temperature before starting. This helps create a smooth batter without lumps.
- Don’t skip the parchment paper: Lining the pan with parchment paper not only helps with easy removal but also prevents the cheesecake from sticking to the sides.
- 2 cups cream cheese, softened
- 1 cup granulated sugar
- 1/2 cup heavy cream
- 3 large eggs
- 1 teaspoon vanilla extract
- 1 tablespoon all-purpose flour
- 1/4 teaspoon salt
- 1 tablespoon lemon juice
- Butter, for greasing the loaf pan
- Parchment paper, for lining the pan
- Preheat the oven to 400°F (200°C).
- Grease a standard loaf pan (9×5 inches) with butter and line the bottom and sides with parchment paper, allowing some overhang.
- In a large mixing bowl, add the softened cream cheese and beat on medium speed until smooth and creamy, about 2-3 minutes.
- Gradually add the granulated sugar while continuing to mix, beating until well combined and fluffy, approximately 2 more minutes.
- Add the eggs one at a time, mixing well after each addition.
- Pour in the heavy cream and vanilla extract, mixing on low speed until just combined.
- Sift the all-purpose flour and salt into the batter and gently fold in using a spatula until just combined. Add the lemon juice and fold it in as well.
- Carefully pour the cheesecake batter into the prepared loaf pan and smooth the top with a spatula.
- Place the loaf pan in the preheated oven and bake for 40-45 minutes until the top is deeply golden brown and the center is slightly jiggly.
- Once baked, remove from the oven and let it cool in the pan for about 15 minutes. Lift it out using the parchment paper overhang and transfer to a wire rack to cool completely.
- After cooling to room temperature, cover with plastic wrap and refrigerate for at least 4 hours, or preferably overnight.
- Once chilled, slice into thick pieces and serve plain or with a drizzle of honey or fresh berries.
- Store any leftovers in an airtight container in the refrigerator for up to 5 days.
- Use room temperature ingredients for a smooth batter.
- Lining the pan with parchment paper prevents sticking and aids in easy removal.
<
Conclusion:
If you’re looking for a dessert that is both indulgent and surprisingly simple to make, the Basque Cheesecake Loaf Pan is an absolute must-try. This recipe combines the rich, creamy texture of traditional cheesecake with the unique, caramelized top that makes Basque cheesecake so beloved. The loaf pan format not only makes it easier to slice and serve but also adds a charming touch to your dessert presentation. Whether you’re hosting a dinner party or simply treating yourself, this cheesecake is sure to impress.
For serving suggestions, I recommend pairing your Basque cheesecake with a dollop of freshly whipped cream or a drizzle of berry compote. The tartness of the berries beautifully complements the richness of the cheesecake, creating a delightful balance of flavors. You could also serve it alongside a scoop of vanilla ice cream for an extra indulgent treat. If you’re feeling adventurous, consider adding a sprinkle of sea salt on top before serving to enhance the flavors even further.
As for variations, feel free to experiment with different flavorings. A hint of lemon zest or a splash of vanilla extract can elevate the taste profile, while incorporating chocolate or coffee can add a unique twist. You could even try adding a layer of fruit puree at the bottom of the loaf pan before pouring in the cheesecake batter for a fruity surprise with every slice. The possibilities are endless, and that’s what makes this recipe so versatile!
I encourage you to give this Basque Cheesecake Loaf Pan recipe a try. It’s a delightful way to satisfy your sweet tooth and impress your friends and family. Once you’ve made it, I’d love to hear about your experience! Did you stick to the classic recipe, or did you try out one of the variations? Share your thoughts and any tips you discovered along the way. Your feedback not only helps me but also inspires others in our cooking community to get creative in the kitchen.
So, roll up your sleeves, gather your ingredients, and let’s get baking! I promise you won’t regret it. The rich, creamy goodness of the Basque cheesecake will have you coming back for seconds, and maybe even thirds. Happy baking!
Basque Cheesecake Loaf Pan: The Ultimate Guide to Baking Perfection
Indulge in the rich and creamy delight of Basque Cheesecake, featuring a beautifully burnt top and velvety texture. This easy recipe creates a decadent dessert perfect for any occasion, sure to impress with its unique flavor and presentation.


Leave a Comment