

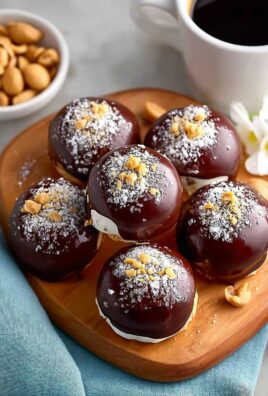
Spring is officially here, and that means we ditch the hot oven for easy treats. Get ready for theBunny Oreo Balls – Cute No-Bake Spring Celebration Dessert, a quick win that looks impossibly cute and tastes even better. These creamy little treasures are the perfect centerpiece for any gathering.
Forget messy baking catastrophes this season; we are diving headfirst into the simplest, most delightful confection imaginable, delivering pure textural satisfaction without breaking a sweat in the kitchen.
- Prep time is minimal, requiring zero baking and only simple kitchen tools, making cleanup an absolute breeze.
- Experience the perfect marriage of rich chocolate cookie crumble and creamy, tangy filling, delivering pure textural satisfaction.
- These charming little bunny shapes instantly elevate any dessert table, guaranteed to elicit “awws” from guests young and old.
- Easily customize the coating colors and decorations to match any holiday, shower, or seasonal party theme effortlessly.
The Great Spring Dessert Dilemma: Why the Oven Must Remain Closed
I don’t know about you, but when the first ray of genuinely warm sunshine hits, my ambition level drops faster than a soufflé in a cold draft. Suddenly, the idea of preheating an oven, sifting flour, and dealing with yeast sounds less appealing than organizing my junk drawer. Springtime is for spontaneity, outdoor naps, and treats that require zero interaction with potentially burning appliances.
My kitchen adventures usually involve highly complex processes that often result in something resembling modern abstract art rather than edible food. I once tried to make a three-layer cake for a garden party. Let’s just say the structural integrity was questionable, and the whole thing collapsed right as I was trying to photograph it. Worse yet, a cheeky sparrow flew in and tried to make a nest out of the melted buttercream. It was a clear sign from the universe: “Stick to the no-bake route, friend.”
That is precisely why these glorious cookie truffles exist. They are the antithesis of stress. They require only three main ingredients, about 15 minutes of active effort, and absolutely zero oven monitoring. This recipe is your ticket to looking like a dessert wizard without actually having to cast any spells or risk a kitchen fire. When you present these perfectly formed, adorable little chocolate bunnies, everyone will assume you spent hours laboring over them. We can keep our secret, can’t we?
The beauty of theBunny Oreo Balls – Cute No-Bake Spring Celebration Dessertlies in its deceptive simplicity. It leverages the binding power of full-fat cream cheese and the deep, dark flavor of chocolate cookies. The result is a dense, fudge-like interior encased in a crisp, sweet shell. They are the perfect embodiment of spring joy: lighthearted, cute, and ready for immediate consumption.
Mastering the Cookie Dough: Tips for Perfect Truffle Texture
The success of any truffle—baked or no-bake—hinges entirely on the texture of the base mixture. If your dough is too sticky, dipping becomes a nightmare; if it’s too dry, the balls will crumble. Achieving the perfect consistency is key to ensuring those cute bunny ears actually stick where they belong.
First, always scrape down the sides of your food processor or mixing bowl thoroughly. You need every crumb to integrate completely into the cream cheese. The consistency you are aiming for should resemble a very thick cookie dough or Play-Doh. It should be firm enough to roll into a smooth ball without sticking excessively to your hands.
Second, do not rush the chilling process. This is the single most important rule of no-bake truffle making. Chilling the dough solidifies the fats in the cream cheese and makes the balls sturdy enough to handle the warm melted chocolate coating. If you try to dip warm balls, the truffle mixture will immediately melt and slide off the toothpick, resulting in a pool of sadness rather than a perfectly coated bunny.
Ingredients for Bunny Oreo Balls – Cute No-Bake Spring Celebration Dessert
Here’s what you’ll need to make this delicious dish:
- Chocolate Sandwich CookiesUse the full-size variety, crust and filling included, as they provide the essential structure and sweetness for the base.
- Cream CheeseUse full-fat, brick-style cream cheese, softened completely to ensure it blends seamlessly with the crushed cookies to form a smooth dough.
- White Coating Chocolate or MeltsChoose high-quality dipping melts or white chocolate chips formulated for melting, as they provide the crisp, smooth outer shell necessary for clean decoration.
- Assorted Sprinkles and DecorationsSmall pink sprinkles or colored icing tubes work well for the noses, while small edible candies or pre-made decorations serve perfectly for the ears.
- Food Coloring (Optional)Use oil-based food coloring if you decide to tint the white chocolate, as standard water-based gels can cause the chocolate to seize up.
The full ingredients list, including measurements, is provided in the recipe card directly below.
How to Make Bunny Oreo Balls – Cute No-Bake Spring Celebration Dessert
Follow these simple steps to prepare this delicious dish:
Step 1: Pulverize the Cookies
Place the entire package of chocolate sandwich cookies, filling and all, into a food processor. Pulse until they resemble fine, uniform crumbs, similar to coarse sand. If you do not have a food processor, place them in a heavy-duty zip-top bag and crush them thoroughly using a rolling pin until no large pieces remain.
Step 2: Create the Dough and Chill
In a large bowl, combine the cookie crumbs and the softened cream cheese. Use a hand mixer or a sturdy spatula to mix thoroughly until a thick, uniform chocolate dough forms. The dough should be moist but firm enough to handle. Roll the mixture into balls approximately 1 inch in diameter (about the size of a golf ball). Place the rolled balls onto a parchment-lined baking sheet and chill them in the freezer for at least 30 minutes. This step is mandatory for successful dipping.
Step 3: Melt and Prepare the Coating
In a microwave-safe bowl, melt the white coating chocolate or candy melts in 30-second intervals, stirring thoroughly between each interval until completely smooth and lump-free. If the chocolate seems too thick for dipping, you can stir in a teaspoon of neutral vegetable oil to thin it slightly. If desired, separate a small amount of chocolate and tint it pink using oil-based food coloring for the noses or accents.
Step 4: Dip and Set the Balls
Working quickly, use a toothpick or a dipping fork to immerse one chilled ball completely into the melted white chocolate. Tap the fork gently on the side of the bowl to allow excess chocolate to drip off, ensuring a thin, smooth coating. Place the dipped truffle back onto the parchment paper. While the coating is still wet, gently press two small candy ears into the top of the truffle to resemble a bunny head. Repeat this process until all truffles are coated and have ears.
Step 5: Decorate and Final Chill
Once all the ears are placed and the chocolate is slightly set, use the pink tinted chocolate (or small pink sprinkles) to add a tiny nose just below the ears. Use a fine-tipped edible marker or melted dark chocolate to dab on two small eyes. Place the finishedBunny Oreo Ballsback into the refrigerator for at least one hour to allow the coating to fully harden before serving.
Transfer to plates and drizzle with extra melted chocolate or dust lightly with powdered sugar for the perfect finishing touch.
Creative Customization and Presentation Ideas
While the Bunny Oreo Balls are certainly adorable on their own, spring entertaining demands a little flair. Customizing these treats is one of the most enjoyable parts of the process. You are the artist, and the truffle is your canvas!
Flavor Variations for the Filling
If you crave something beyond the classic chocolate and cream cheese profile, a subtle flavor enhancement can elevate these treats beautifully. Try adding a quarter teaspoon of pure vanilla bean paste or a small amount of finely grated orange zest to the cookie dough mixture during Step 2. The orange zest brightens the deep chocolate flavor and gives the truffle a fresh, springtime feel. Alternatively, a hint of peppermint extract works wonderfully for a mint-chocolate variation, although you might want to use green decorations instead of traditional spring colors.
Presentation Perfected
For a festive presentation, arrange the finished bunnies on a bed of shredded coconut tinted green to look like Spring Festival grass. You can also use small, pastel-colored paper baking cups to hold individual truffles, which makes serving easier and adds another layer of color. If you are serving them at a party, consider placing them on a tiered cake stand alongside fresh berries or small edible flowers to create a truly spectacular visual centerpiece. Remember, these treats hold up best when kept chilled, so pull them out of the refrigerator right before your guests arrive.
Frequently Asked Questions About No-Bake Truffles
While cream cheese is the gold standard for its flavor and stability, you can substitute it with thick, full-fat mascarpone cheese for an even richer, slightly sweeter result. Some bakers also use a mixture of butter and powdered sugar for a firmer consistency, but this changes the overall flavor and requires slightly different ratios for the binding process. Ensure whatever binder you choose is softened to room temperature before mixing.
Store these truffles in an airtight container in the refrigerator. Due to the cream cheese, they will maintain their best quality for up to two weeks. You can also freeze the completed truffles for up to three months. If freezing, let them thaw slowly in the refrigerator overnight before serving to maintain the integrity of the chocolate coating and prevent condensation.
Chocolate seizes when it comes into contact with even a tiny amount of water or steam. Ensure all your utensils, bowls, and surfaces are completely dry before you start melting the chocolate. If you are using food coloring, use oil-based dyes specifically designed for chocolate, not water-based gel colors.
Absolutely! If you cannot find pre-made bunny ear candies, you can easily create ears using sliced almonds (standing them upright in the wet chocolate) or small pieces of dried mango or apricot cut into ear shapes. For a fun alternative, use mini pretzels broken in half—the curved pieces make excellent, crunchy ears, adding a delightful savory contrast to the sweet filling.
These adorable no-bake treats prove that the best desserts don’t require complicated methods or stressful oven schedules. TheBunny Oreo Balls – Cute No-Bake Spring Celebration Dessertwill bring smiles and sweet, satisfying crunch to everyone celebrating the change of season. Go ahead, close that oven door, and enjoy the sunshine!
The Great Spring Dessert Panic of ’24: Why No-Bake is Always the Answer
I remember last year, the morning of the big spring gathering. I had planned a magnificent, towering cake, but somewhere between the third cup of flour and the realization that my oven thermometer was clearly lying, disaster struck. It wasn’t just sunken; it had the architectural integrity of a tired sponge. My spirit, much like the cake, was crushed. That’s when I vowed: henceforth, spring desserts must be simple, joyful, and require zero interaction with unreliable heating elements.
Enter the true hero of easy entertaining: the truffle ball. But plain truffles are boring. We needed whimsy. We needed cuteness. We needed the perfect centerpiece for any celebration—something delightful, simple, and utterly charming. We needed theBunny Oreo Balls – Cute No-Bake Spring Celebration Dessert.
Why These Treats Are the Easiest Dessert You Will Ever Make
Forget tempering chocolate or waiting for yeast to rise. This recipe demands only a food processor and about 20 minutes of active time. The hardest part is not eating the entire batch of cream cheese filling before it makes it to the chilling stage. Trust me, these little bunnies are so charming, they practically hop right onto your dessert table. They are a guaranteed crowd-plaser for both children and adults who appreciate adorable snacks.
Gathering Your Simple Ingredients
You probably have half of these items in your pantry right now. The beauty of this recipe lies in its simplicity. Ensure your cream cheese is softened to room temperature; this is non-negotiable if you want a smooth, easily blendable dough. Cold cream cheese leads to lumpy, difficult-to-roll misery. We are actively avoiding misery today, folks.
- One standard package (about 14 oz) of chocolate sandwich cookies
- 8 ounces (one block) of full-fat cream cheese, completely softened
- 16 ounces of white chocolate melting wafers or high-quality almond bark
- Decorations: Small candy eyes, tiny pink heart sprinkles (or pink food coloring for noses), and pretzel sticks or slivered almonds for ears.
Crafting the Perfect Bunny Oreo Balls: Step-by-Step Guide
The transformation from crunchy cookie to velvety truffle is almost magical. Pay attention to the texture during the mixing stage; it should be firm enough to hold its shape but soft enough to roll easily. This base recipe is incredibly stable, providing the ideal foundation for these celebratory treats.
Step 1: Crushing the Cookies (The Loud Part)
Place the entire package of chocolate sandwich cookies into a food processor. Yes, the filling stays in! Process them until they resemble fine, damp dirt. If you don’t have a food processor, place them in a resealable bag and attack them with a rolling pin. This is an excellent way to release any pent-up stress accumulated from trying to bake that awful cake last year.
Step 2: Mixing the Base
Add the softened cream cheese directly into the cookie crumbs. Process again until a thick, uniform dough forms. It should pull away from the sides of the processor and feel slightly tacky, but not sticky. If it seems too dry, you can add a tiny splash of milk or heavy cream, but usually, the full-fat cream cheese provides sufficient moisture for binding.
Step 3: Rolling and Chilling
Scoop the mixture using a small cookie scoop or a teaspoon. Roll the dough tightly into small spheres, about one inch in diameter. This recipe yields approximately 40 to 45 truffle balls, depending on their size. Place the rolled balls onto a baking sheet lined with parchment paper. This chilling step is absolutely crucial for stability. Place them in the freezer for 20 minutes or the refrigerator for at least one hour. They must be firm before dipping.
The Art of Bunny Decoration
Once the ball is dipped, immediately place it back onto the parchment-lined sheet. You need to work swiftly while the chocolate is still wet to attach the decorations. This is where your treats truly transform into adorableBunny Oreo Balls – Cute No-Bake Spring Celebration Dessertitems.
Melt the white chocolate wafers according to the package directions. Use a deep, narrow bowl for easier dipping. Insert a toothpick into a chilled ball, dunk it completely into the melted chocolate, and tap the toothpick gently against the side of the bowl to remove excess coating. Quick action is essential here; if the chocolate is too hot or you take too long, the truffle will start to warm up and crumble into the coating.
For the ears, you have options. If using slivered almonds, insert two parallel almonds gently into the top half of the ball. If using pretzel sticks, snap small pieces off and insert them firmly. For the face, place two candy eyes and one pink sprinkle (or a small dot of pink frosting) for the nose while the coating is still glossy. If the coating sets before you can decorate, use a small dab of melted chocolate as “glue.”
Allow the finished bunnies to set completely. This usually takes another 30 minutes in the refrigerator. Once set, they are ready to serve and amaze your guests. My nephew, Finn, once tried to name all 40 of them. He got to Bartholomew before getting distracted by the sheer deliciousness of the chocolate shell, proving their addictive quality.
Creative Alternatives for Your Celebration Dessert
While the classic chocolate sandwich cookie is the default, feel free to experiment with flavor combinations. You could use mint cookies for a vibrant green filling, or peanut butter flavored ones for a rich, nutty twist. Remember, this recipe is incredibly forgiving and thrives on fun additions. If you want a more complex coating, try mixing a tiny bit of vibrant food coloring (gel, not liquid!) into the melted white chocolate before dipping to create pastel pink or yellow bunnies, perfect for a garden party aesthetic.
If you cannot find candy eyes, simply use mini chocolate chips, pointed side down, for a subtle eye effect. Alternatively, you can pipe small dots of contrasting black frosting for a more cartoonish look. The structural integrity of the truffle base ensures that it holds up beautifully under different coatings and decorations, making it versatile for any holiday or theme. These delightful sweets make excellent gifts or party favors.
These beautiful and easy-to-make treats prove that impressive desserts don’t require professional pastry skills or an unpredictable oven. They require enthusiasm, a functioning food processor, and a willingness to embrace maximum cuteness. Serve them chilled alongside some fresh berries or a light citrus punch, and watch them disappear faster than a real bunny hiding in a hedge. The versatility of theseBunny Oreo Ballsmeans they truly fit any occasion needing a touch of sweet, spring joy.
To ensure you achieve maximum aesthetic delight, always make sure the pretzel or almond ears are small enough to be proportionate to the size of the ball. Oversized ears can lead to a top-heavy bunny that struggles to stand upright. Remember, we are aiming for cute, not clumsy. If you find the pretzels are sliding, anchor them using a thicker application of the melted white chocolate, which acts like a sturdy foundation cement.
Many readers ask if they can substitute the cream cheese for a lower-fat version. While you technically can, I strongly advise against it. Full-fat cream cheese provides the necessary richness and firmness required for the balls to hold their shape during rolling and maintain a smooth texture when chilled. Using lower-fat alternatives often results in a watery or overly sticky dough that is frustrating to handle and produces a grainy texture when eaten.
Perfecting the Cooking Process

For maximum efficiency, crush the cookies first and immediately mix in the softened cream cheese to create the dough. While the truffle balls are chilling rigidly in the freezer, melt and prepare the white chocolate coating and lay out all your decorations. This minimizes downtime and ensures the chocolate stays at the ideal dipping temperature.
Add Your Touch
Swap the traditional chocolate sandwich cookies for lemon or vanilla wafers for a brighter flavor base, pairing well with a spring theme. For a deeper coating flavor, mix a teaspoon of espresso powder into the melted white chocolate. If avoiding nuts for the ears, use small slivers of dried mango or apple slices instead.
Storing & Reheating
Store finishedBunny Oreo Ballsin an airtight container in the refrigerator for up to two weeks, keeping them away from strong odors. Since this is a no-bake dessert, reheating is unnecessary. Always allow them to stand at room temperature for five to ten minutes before serving for the best texture.
Expert Tips for Flawless Bunny Creation
- Use high-quality melting wafers for dipping, as standard white chocolate chips often contain stabilizers that make them frustratingly thick and difficult to work with.
- If your mixture is too sticky after mixing, add one tablespoon of powdered sugar to firm it up, or chill the dough briefly before attempting to roll.
- Keep the cookie balls frozen or very cold during dipping. This rapid temperature contrast helps the melted chocolate set almost instantly, preventing messy drips and cracks.
The first time I served these, my neighbor swore I spent days crafting them; she didn’t believe me when I confessed it only took one episode of my favorite reality show and some aggressive cookie crushing.
Conclusion for Bunny Oreo Balls – Cute No-Bake Spring Celebration Dessert
The journey to creating the perfect Bunny Oreo Balls – Cute No-Bake Spring Celebration Dessert might involve a slightly sticky kitchen and perhaps one or two necessary truffle taste tests—purely for quality control, of course. But the result is always worth the minor mess! These charming, foolproof snacks prove that you don’t need an oven or complex baking skills to bring major joy to your spring table. Whether you are hosting a grand festive brunch or just need a simple, smile-inducing afternoon treat, these easy no-bake bunny truffles offer maximum flavor and irresistible cuteness. Go ahead, crush those cookies, roll those balls, and unleash the edible springtime magic for all your guests!
FAQs
Why did my cream cheese mixture end up too sticky or too runny?
Dealing with truffle mix texture is a delicate dance! If your mixture seems overly sticky, it likely means your cream cheese was too soft or perhaps you used slightly too much binder. The best fix is to pop the whole bowl into the freezer for about 15 minutes; this helps the fat firm up and makes rolling significantly easier. Conversely, if the mix feels too crumbly and refuses to hold a shape, you might need a tiny splash more binder. Add a teaspoon of melted butter or a drop of milk, mix gently, and test the consistency again. Remember, the goal is play-dough perfection, not cement or soup, so adjust slowly!
Can I freeze these adorable Bunny Oreo Balls – Cute No-Bake Spring Celebration Dessert?
Absolutely, you can freeze these delightful treats! Freezing is a fantastic way to prepare them ahead of a big gathering or holiday celebration. First, ensure the chocolate coating has completely set and is dry to the touch. Then, place the Bunny Oreo Balls – Cute No-Bake Spring Celebration Dessert on a baking sheet lined with parchment paper and flash-freeze them for about an hour. Once solid, transfer them to an airtight container, separating layers with wax paper to prevent sticking. They will keep well for up to three months. When ready to serve, thaw them overnight in the refrigerator to maintain their optimal texture and adorable shape.
What are the best substitutions for the melted chocolate coating?
If standard white or dark chocolate isn’t your preference, or if you aim for really vibrant color without traditional food dye mess, there are some great alternatives! You can easily use brightly colored candy melts in various springtime shades like pastel blue, sunny yellow, or soft pink. For a more natural and rustic approach, try mixing a small amount of vegetable oil with white chocolate and stirring in natural food powders, such as dried blueberry powder for purple or turmeric for a soft orange hue. Another delicious option is simply rolling the chilled balls in finely shredded coconut or a generous dusting of powdered sugar for a fluffy, snow-like bunny exterior.
How do I store leftover Bunny Oreo Balls – Cute No-Bake Spring Celebration Dessert to keep them fresh?
To maximize the lifespan of your delicious Bunny Oreo Balls – Cute No-Bake Spring Celebration Dessert, refrigeration is non-negotiable. Because they contain cream cheese, these charming treats must be stored in the fridge in an airtight container to prevent them from drying out or absorbing foreign odors. If you decorated them with delicate features like thin sugar ears or whiskers, store them in a single layer or use parchment paper dividers to prevent smushing the adorable faces. When stored correctly, they will maintain their freshness and fantastic texture for up to one week. However, based on our highly scientific testing, they rarely last longer than 48 hours once family members discover them!

Leave a Comment