

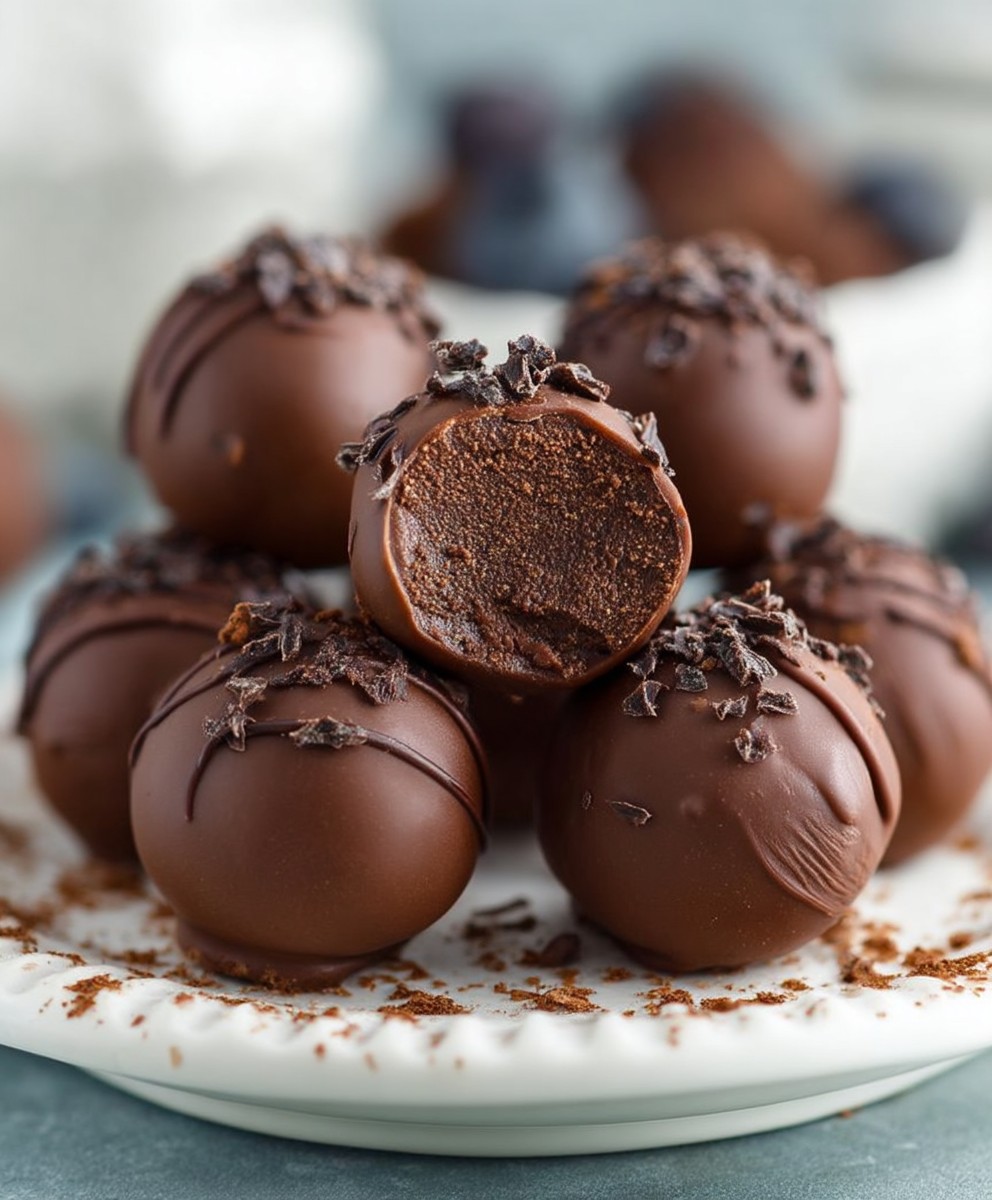
Chocolate Brownie Truffles: A Decadent Delight
Chocolate Brownie Truffles are the ultimate indulgence for any chocolate lover. Imagine sinking your teeth into a rich, fudgy brownie that melts in your mouth, only to discover a delightful truffle center that takes the experience to a whole new level. These little bites of heaven are not just a treat; they are a celebration of chocolate in its most luxurious form.
The history of brownie truffles is as rich as their flavor. Originating from the classic American brownie, these truffles have evolved to become a popular dessert at parties and gatherings, symbolizing joy and indulgence. People adore Chocolate Brownie Truffles not only for their irresistible taste and texture but also for their convenience. They are easy to make and can be prepared ahead of time, making them a perfect choice for any occasion.
Whether you’re looking to impress guests or simply satisfy your sweet tooth, Chocolate Brownie Truffles are sure to please. With their combination of chewy brownie and creamy truffle, they offer a delightful contrast that keeps everyone coming back for more. So, let’s dive into this delicious recipe and create something truly special!

Ingredients:
- 1 cup all-purpose flour
- 1 cup granulated sugar
- 1/2 cup unsweetened cocoa powder
- 1/2 teaspoon baking powder
- 1/4 teaspoon salt
- 1/2 cup unsalted butter, melted
- 2 large eggs
- 1 teaspoon vanilla extract
- 1/2 cup semi-sweet chocolate chips
- 1 cup chocolate coating or melting chocolate (dark or milk)
- 1/2 cup crushed nuts (optional, for coating)
- 1/2 cup sprinkles (optional, for coating)
Preparing the Brownie Batter
- Preheat your oven to 350°F (175°C). Grease an 8×8 inch baking pan or line it with parchment paper for easy removal.
- In a large mixing bowl, combine the all-purpose flour, granulated sugar, cocoa powder, baking powder, and salt. Whisk these dry ingredients together until they are well mixed.
- In a separate bowl, melt the unsalted butter in the microwave or on the stovetop. Allow it to cool slightly before adding it to the dry ingredients.
- Add the melted butter, eggs, and vanilla extract to the dry mixture. Stir until just combined. Be careful not to overmix; a few lumps are okay.
- Fold in the semi-sweet chocolate chips, ensuring they are evenly distributed throughout the batter.
Baking the Brownies
- Pour the brownie batter into the prepared baking pan, spreading it evenly with a spatula.
- Bake in the preheated oven for 20-25 minutes, or until a toothpick inserted into the center comes out with a few moist crumbs (not wet batter).
- Once baked, remove the brownies from the oven and let them cool in the pan for about 10 minutes. Then, transfer them to a wire rack to cool completely.
Forming the Truffles
- Once the brownies are completely cooled, crumble them into a large mixing bowl. Use your hands or a fork to break them into fine crumbs.
- Using your hands, take small portions of the brownie crumbs and roll them into balls, about 1 inch in diameter. Place the rolled truffles on a baking sheet lined with parchment paper.
- Once all the brownie mixture is rolled into balls, place the baking sheet in the refrigerator for about 30 minutes. This will help the truffles firm up and hold their shape.
Coating the Truffles
- While the truffles are chilling, prepare the chocolate coating. Melt the chocolate coating or melting chocolate in a microwave-safe bowl in 30-second intervals, stirring in between until smooth and fully melted.
- Once the truffles have chilled and firmed up, remove them from the refrigerator. Using a fork or a toothpick, dip each truffle into the melted chocolate, ensuring it is fully coated.
- Allow any excess chocolate to drip off before placing the coated truffle back onto the parchment-lined baking sheet.
- If you want to add a crunchy coating, sprinkle crushed nuts or sprinkles on top of the truffles while the chocolate is still wet.
- Repeat the dipping process for all the truffles until they are all coated.
Setting the Truffles
- Once all the truffles are coated, place the baking sheet in the refrigerator for about 30 minutes to allow the chocolate coating to set completely.
- After the chocolate has hardened, you can transfer the truffles to an airtight container for storage. They can be kept in the refrigerator for up to a week or at room temperature for a few days.
Serving Suggestions
- When ready to serve, you can arrange the truffles on a decorative plate or in a gift box for a delightful presentation.
- These chocolate brownie truffles make a perfect treat for parties, holidays, or as a sweet gift for friends and
Conclusion:
If you’re looking for a delightful treat that combines the rich, fudgy goodness of chocolate brownies with the indulgent creaminess of truffles, then these Chocolate Brownie Truffles are an absolute must-try! They are not only incredibly easy to make but also offer a perfect balance of flavors and textures that will leave your taste buds dancing with joy. The combination of the dense brownie center and the smooth chocolate coating creates a heavenly bite that is simply irresistible.
One of the best things about these truffles is their versatility. You can serve them as a decadent dessert at your next dinner party, or simply enjoy them as a sweet snack throughout the week. For a fun twist, consider rolling them in different toppings such as crushed nuts, sprinkles, or even coconut flakes to add an extra layer of flavor and texture. You could also experiment with flavored chocolate coatings, like white chocolate or dark chocolate, to suit your personal taste. If you’re feeling adventurous, try adding a hint of espresso or a splash of your favorite liqueur to the brownie mixture for an adult version that’s sure to impress!
I encourage you to give this recipe a try and experience the joy of making your own Chocolate Brownie Truffles. They are perfect for sharing with friends and family, or even as a thoughtful homemade gift for someone special. Once you’ve made them, I would love to hear about your experience! Did you stick to the classic recipe, or did you add your own unique twist? Share your thoughts and any variations you tried in the comments below.
Remember, the beauty of these truffles lies in their simplicity and the joy they bring. So gather your ingredients, roll up your sleeves, and dive into the delicious world of chocolate brownie truffles. You won’t regret it!
Chocolate Brownie Truffles: The Ultimate Indulgent Treat
Indulge in rich and decadent Chocolate Brownie Truffles, made from fudgy brownies rolled into bite-sized balls and coated in smooth chocolate. Perfect for parties or as a sweet gift, these truffles are sure to satisfy any chocolate lover's cravings!
Ingredients
- 1 cup all-purpose flour
- 1 cup granulated sugar
- 1/2 cup unsweetened cocoa powder
- 1/2 teaspoon baking powder
- 1/4 teaspoon salt
- 1/2 cup unsalted butter, melted
- 2 large eggs
- 1 teaspoon vanilla extract
- 1/2 cup semi-sweet chocolate chips
- 1 cup chocolate coating or melting chocolate (dark or milk)
- 1/2 cup crushed nuts (optional, for coating)
- 1/2 cup sprinkles (optional, for coating)
Instructions
- Preheat your oven to 350°F (175°C). Grease an 8×8 inch baking pan or line it with parchment paper for easy removal.
- In a large mixing bowl, combine the all-purpose flour, granulated sugar, cocoa powder, baking powder, and salt. Whisk these dry ingredients together until they are well mixed.
- In a separate bowl, melt the unsalted butter in the microwave or on the stovetop. Allow it to cool slightly before adding it to the dry ingredients.
- Add the melted butter, eggs, and vanilla extract to the dry mixture. Stir until just combined. Be careful not to overmix; a few lumps are okay.
- Fold in the semi-sweet chocolate chips, ensuring they are evenly distributed throughout the batter.
- Pour the brownie batter into the prepared baking pan, spreading it evenly with a spatula.
- Bake in the preheated oven for 20-25 minutes, or until a toothpick inserted into the center comes out with a few moist crumbs (not wet batter).
- Once baked, remove the brownies from the oven and let them cool in the pan for about 10 minutes. Then, transfer them to a wire rack to cool completely.
- Once the brownies are completely cooled, crumble them into a large mixing bowl. Use your hands or a fork to break them into fine crumbs.
- Using your hands, take small portions of the brownie crumbs and roll them into balls, about 1 inch in diameter. Place the rolled truffles on a baking sheet lined with parchment paper.
- Once all the brownie mixture is rolled into balls, place the baking sheet in the refrigerator for about 30 minutes. This will help the truffles firm up and hold their shape.
- While the truffles are chilling, prepare the chocolate coating. Melt the chocolate coating or melting chocolate in a microwave-safe bowl in 30-second intervals, stirring in between until smooth and fully melted.
- Once the truffles have chilled and firmed up, remove them from the refrigerator. Using a fork or a toothpick, dip each truffle into the melted chocolate, ensuring it is fully coated.
- Allow any excess chocolate to drip off before placing the coated truffle back onto the parchment-lined baking sheet.
- If you want to add a crunchy coating, sprinkle crushed nuts or sprinkles on top of the truffles while the chocolate is still wet.
- Repeat the dipping process for all the truffles until they are all coated.
- Once all the truffles are coated, place the baking sheet in the refrigerator for about 30 minutes to allow the chocolate coating to set completely.
- After the chocolate has hardened, you can transfer the truffles to an airtight container for storage. They can be kept in the refrigerator for up to a week or at room temperature for a few days.
- When ready to serve, you can arrange the truffles on a decorative plate or in a gift box for a delightful presentation.
- These chocolate brownie truffles make a perfect treat for parties, holidays, or as a sweet gift for friends and family.
Notes
- Feel free to customize the coatings with your favorite toppings, such as coconut flakes or crushed cookies.
- For a richer flavor, consider using dark chocolate for the coating.
Leave a Comment