

Remember those sweltering summer days when the only solution was a truly massive scoop of pure comfort? My answer was always the decadent swirl of homemadeChocolate Peanut Butter Ice Cream.
This version captures that childhood magic, perfectly balancing salty peanut butter bliss with rich, dark cocoa, proving that homemade treats always taste better.
- Requires no fancy churning equipment, allowing anyone to achieve creamy, parlor-quality ice cream directly from a standard freezer setup.
- A sophisticated marriage of intensely roasted peanuts and deep, dark chocolate notes, avoiding cloying sweetness for a mature taste.
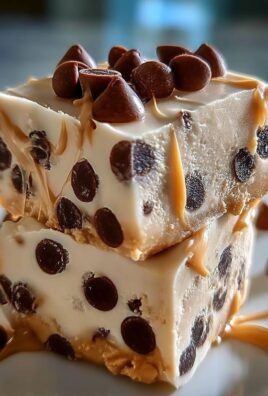
- Features a striking marble effect created by swirling thick, homemade peanut butter ribbons into the dark chocolate base, making it highly photogenic.
- Excellent served plain, or use it as the star component in indulgent milkshakes or layered ice cream cakes for any celebration.
Ingredients for Chocolate Peanut Butter Ice Cream
Here’s what you’ll need to make this delicious dish:
- Heavy CreamUse high-quality dairy cream with at least 35% milk fat for the ultimate richness and smooth texture necessary for freezing.
- Whole MilkCombine this with the cream to create the ideal base custard consistency, ensuring a delicate and well-balanced frozen result.
- Granulated SugarThis ingredient provides essential sweetness and, critically, lowers the freezing point of the mixture to keep the final product soft and scoopable.
- Unsweetened Cocoa PowderOpt for high-quality dark cocoa powder, preferably Dutch-processed, to achieve that deep, complex chocolate flavor without bitterness.
- Natural Peanut ButterChoose a smooth, high-oil natural peanut butter; you will use this both in the base and for the delightful ribbons of flavor throughout the ice cream.
- Pure Vanilla PowderA splash of high-quality vanilla enhances both the chocolate and the peanut notes, adding depth and rounding out the overall flavor profile.
- Fine Sea SaltSalt is crucial for balancing the sweetness and intensifying the flavor of the peanut butter, preventing the ice cream from tasting flat.
The full ingredients list, including measurements, is provided in the recipe card directly below.
How to Make Chocolate Peanut Butter Ice Cream
Follow these simple steps to prepare this delicious dish:
- Combine the Chocolate BaseGently whisk together the heavy cream, whole milk, sugar, cocoa powder, and salt in a large saucepan over medium heat. Heat the mixture just until the sugar dissolves and steam begins to rise, stirring constantly for about five minutes, ensuring it does not boil.
- Chill ThoroughlyRemove the saucepan from the heat, stir in the vanilla powder, and immediately pour the base mixture into an airtight container. Refrigerate the mixture for a minimum of four hours, but preferably overnight, as a well-chilled base freezes into a much smoother final product.
- Churn the MixturePour the cold chocolate base into your ice cream maker (ensure the bowl is pre-frozen according to manufacturer directions). Churn for 20 to 30 minutes, or until the ice cream achieves the texture of soft-serve yogurt.
- Prepare the Peanut Butter SwirlWhile the ice cream churns, slightly warm 1/4 cup of natural peanut butter until it is runny enough to drizzle easily. Set this aside to cool slightly before use.
- Layer and FreezeTransfer half of the churned soft-serve into a freezer-safe container. Drizzle half of the warmed peanut butter over the layer, then add the remaining ice cream. Drizzle the final peanut butter and use a knife to gently swirl it through the mixture for an attractive ribbon effect.
Transfer the sealed container to the freezer for at least six hours (or overnight) to firm up completely before serving with an extra sprinkle of roasted peanuts for the perfect finishing touch.
We all have that one dessert that transports us back to simpler times. For me, the rich scent of cocoa mingling with the nutty aroma of freshly opened peanut butter is a direct portal to third grade, specifically the time I traded my entire lunch for an extra-large scoop of this very flavor. While my adult self knows better than to swap a balanced meal for dessert (most days), the craving for that perfect salty-sweet balance remains irresistible.
Creating this frozen delight at home isn’t just about controlling the quality of the ingredients; it’s about perfecting the texture. Store-bought versions often suffer from being either too icy or overwhelmingly fatty, but when you make your ownChocolate Peanut Butter Ice Cream, you control the destiny of every molecule. You get to decide how dramatic that swirl is and how deep that cocoa profile goes. This recipe guarantees a supremely creamy, melt-in-your-mouth experience that screams “comfort” louder than a forgotten blanket fort.
If you’re skeptical about ditching the store-bought tub, consider this: homemade ice cream contains none of the stabilizers or mysterious gums necessary for a shelf life measured in months. You are creating a fresh, dairy-rich custard that freezes beautifully. The secret lies in the quality of your base ingredients and, crucially, in the chilling process. Patience truly is the single most important ingredient in achieving ice cream perfection—right after the peanut butter, obviously.
Why Homemade Chocolate Peanut Butter Ice Cream Wins
Many home cooks hesitate to tackle ice cream, fearing the process is too complex or requires specialized equipment only used once a decade. This couldn’t be further from the truth. If you can whisk ingredients on a stove and possess a working freezer, you can create a superior frozen dessert. The beauty of the classic combination of chocolate and peanut butter is that it hides minor imperfections brilliantly. If your churning isn’t perfect, the chunky mix-ins and sticky ribbons distract happily.
The flavor profile here is designed for maximum impact. We deliberately use dark, unsweetened cocoa powder because the sweetness comes primarily from the added sugar and the natural sweetness in the peanut butter ribbons. This ensures the final product is intensely flavored without being syrupy or heavy. Furthermore, we rely heavily on the fat content of the heavy cream and whole milk. Fat is the enemy of ice crystals; the higher the fat content, the smoother the mouthfeel, providing that signature “scoopable” quality we demand in a high-quality dessert. Make sure your cream is fresh and your enthusiasm is high!
Mastering the Chill: Tips for Ultimate Creaminess
Achieving that coveted smooth texture requires adherence to two key rules: ensure everything is absolutely freezing cold before churning, and understand the role of overrun. The moment you finish preparing your chocolate base, you must chill it completely. Room temperature liquid will immediately melt the edges of your freezer bowl, leading to larger ice crystals and a grainy texture. Four hours is the bare minimum, but an overnight rest in the refrigerator allows the fats and proteins to fully hydrate, resulting in a significantly smoother ice cream.
Overrun refers to the amount of air incorporated during the churning process. A higher overrun makes for a lighter, fluffier texture, while a lower overrun produces a denser, richer ice cream—the kind that makes the spoon stand up straight. Home machines generally produce a fantastic low-overrun product, maximizing flavor concentration. Don’t over-churn; stop the machine once the mixture resembles soft-serve. The remaining freezing time in the freezer, known as the “hardening stage,” sets the final structure. Use an airtight, shallow container for this stage, which helps theChocolate Peanut Butter Ice Creamfreeze uniformly and quickly.
Flavor Twists and Perfect Mix-Ins
While the classic formula for Chocolate Peanut Butter Ice Cream is flawless, embracing variations is part of the fun of homemade treats. Once the ice cream reaches the soft-serve stage, before transferring it to the final container, that is the perfect moment to integrate delicious mix-ins. If you enjoy texture contrast, consider adding crushed, oven-baked pretzels for a salty crunch that dramatically complements the peanut butter flavor.
For an ultra-decadent option, crumble in small pieces of dark chocolate fudge brownies. Ensure the brownies are slightly chilled so they don’t dissolve immediately into the base. If you prefer fruitiness, a ribbon of tart cherry jam swirled along with the peanut butter adds a surprising complexity, cutting through the richness beautifully. Remember to avoid adding large amounts of liquid or watery additions during the churning phase, as this dramatically increases the crystal formation and compromises the final texture. Stick to solid mix-ins or thick sauces incorporated right before the hardening stage for the best results.
Frequently Asked Questions About This Dessert
How do I keep my homemade ice cream from freezing rock hard?
The key is sugar and fat. Sugar lowers the freezing point, keeping the ice cream softer. Ensure you use the specified amount of sugar and high-fat dairy. If you find it still too hard, a small amount of clear corn syrup (which is an invert sugar) can be added to the base, as it further inhibits the formation of large ice crystals.
Can I make this Chocolate Peanut Butter Ice Cream without an ice cream maker?
Yes, you can, but it requires elbow grease. After chilling the base, pour it into a freezer-safe container. Freeze for 45 minutes, then remove and beat the mixture vigorously with a hand mixer or stand mixer to break up crystals. Repeat this process every 30-45 minutes for about three hours until it achieves a creamy texture before the final freeze.
What is the best type of peanut butter to use for the swirl?
Use smooth, natural peanut butter that separates slightly, making it runnier when warmed. Avoid highly stabilized, non-natural peanut butter for the swirl, as it is too thick and won’t drizzle attractively. If your natural peanut butter is too stiff, warm it gently in the microwave for 10 seconds before drizzling.
How long will homemade ice cream last in the freezer?
While safe to eat for up of three months if stored properly, homemade ice cream is best consumed within the first two weeks. After that, the quality begins to degrade, and moisture loss can result in freezer burn, affecting the overall texture and freshness of the Chocolate Peanut Butter Ice Cream.
We all have that one dessert that transports us back to simpler times. For me, it was always the combination of rich, deep chocolate and salty, creamy peanut butter. Forget fancy French pastries; if it wasn’t swimming in that glorious flavor fusion, I wasn’t interested. My first attempt at making a homemade version of this delight was, shall we say, a chilling disaster. I ended up with a rock-solid, crystalized block that required an industrial chisel just to get a spoonful. My dog looked disappointed, and my freezer wept.
But fear not, fellow dessert enthusiasts! Years of trial and error—and one slightly damaged ice cream machine—led me to this masterpiece. This isn’t just ice cream; it’s an experience. It’s the perfect blend of silky, dense custard and a luscious, slightly chunky swirl of America’s favorite spread. We are talking about crafting the ultimate, decadent homemadeChocolate Peanut Butter Ice Cream. Get ready to impress your taste buds, because this recipe delivers maximum flavor with minimal freezer burn drama.
The Magic Behind the Creaminess
Achieving that professional, scoop-shop quality texture requires understanding a few simple principles. First, you need a high-fat base. We rely heavily on heavy cream and whole milk to prevent ice crystal formation. Second, quality ingredients matter. Don’t skimp on the chocolate. Use something with at least 60% cocoa solids for that deep, complex flavor that stands up beautifully against the saltiness of the peanut butter. I often use Dutch-process cocoa powder paired with melted dark chocolate for a double dose of richness.
The secret weapon here, however, is the peanut butter swirl itself. We treat the peanut butter separately, blending it with a touch of powdered sugar and a little oil to keep it pliable even when frozen. This ensures that when you scoop the final product, you get soft, ribbons of nutty goodness, not brittle shards. This careful balance of fat, sugar, and chilling time is what elevates this frozen dessert from simply good to utterly divine.
The Indispensable Ingredients
Before the churning begins, gather your supplies. Precision matters in ice cream making, so measure carefully.
- 1 cup whole milk (full fat is essential)
- 2 cups heavy whipping cream
- 3/4 cup granulated sugar
- 1/2 cup unsweetened cocoa powder (high quality recommended)
- 4 large egg yolks
- 1 teaspoon pure vanilla powder
- Pinch of salt
- 1/2 cup bittersweet chocolate, chopped (60% to 70% cocoa)
For the Peanut Butter Swirl:
- 3/4 cup creamy peanut butter (avoid natural, oil-separated types for this)
- 1/4 cup powdered sugar
- 2 tablespoons neutral oil (like grapeseed or sunflower)
Equipment Check: The Chill Factor
While patience is the primary tool, a good ice cream machine makes life much easier. Ensure your churning bowl is completely frozen—usually 24 hours in advance. You also need a decent saucepan, a whisk, and an airtight container for the finished product. Don’t forget a fine-mesh sieve to strain the custard base; this step guarantees the silkiest texture possible, catching any stray cooked egg pieces. A rubber spatula is also crucial for scraping down the sides of the saucepan and ensuring all that delicious mixture makes it into the churner. Remember, the colder your custard base is before churning, the faster and smoother the result will be.
Step-by-Step Guide to Creamy Bliss
Prepping the Chocolate Base
Start by whisking the egg yolks and sugar in a medium bowl until the mixture lightens and thickens slightly. In a saucepan, combine the whole milk, cocoa powder, salt, and half of the heavy cream. Heat this mixture over medium heat, stirring constantly, until steaming but not boiling. Remove the saucepan from the heat.
Temper the egg yolks. Slowly drizzle about half a cup of the hot chocolate mixture into the yolk mixture while whisking vigorously. This gentle warming prevents the eggs from scrambling. Pour the tempered yolk mixture back into the saucepan with the remaining hot liquid. Return the saucepan to low heat. Stir continuously with a rubber spatula until the custard thickens enough to coat the back of the spatula (reaching about 175°F or 80°C). Do not allow it to boil!
Remove the custard from the heat. Stir in the chopped bittersweet chocolate and vanilla powder until fully melted and smooth. Pour the remaining heavy cream into a large bowl set over an ice bath. Strain the warm custard into the cold cream mixture, stirring constantly to cool it down rapidly. Once cooled, cover the bowl and refrigerate for at least 6 hours, or ideally overnight. A thoroughly chilled base is non-negotiable for perfect texture.
The Nut Butter Swirl Strategy
While the custard chills, prepare the swirl. Combine the creamy peanut butter, powdered sugar, and neutral oil in a small bowl. Stir until perfectly smooth and slightly pourable. If it seems too stiff, add a tiny splash more oil. Set this mixture aside at room temperature; we want it easily drizzled later.
Once the chocolate base is fully chilled, churn it according to your ice cream maker’s instructions. This usually takes between 20 and 30 minutes, resulting in soft-serve consistency. Transfer half of the freshly churnedChocolate Peanut Butter Ice Creaminto a freezer-safe container. Drizzle generously with half of the peanut butter swirl mixture. Repeat with the remaining ice cream and the rest of the swirl. Use a knife or spatula to gently cut through the mixture a few times to create the perfect ribbons. Cover the container tightly and freeze for at least 4 hours to firm up before serving.
Perfecting the Cooking Process

For maximum efficiency and the silkiest base, prepare the chocolate custard mixture first, ensuring adequate chilling time, which is critical for smooth churning. While the base cools, use that time to prepare the peanut butter swirl and pre-freeze your serving container.
Add Your Touch
Try folding in miniature chocolate chips or chopped roasted peanuts during the last five minutes of churning for added crunch. Alternatively, swap peanut butter for almond butter or cashew butter to change the nut profile, or add a pinch of chili powder to the cocoa base for a spicy kick.
Storing & Reheating
Store your homemade frozen dessert in an airtight container pressed directly against the surface with plastic wrap to minimize freezer burn. It lasts beautifully for up to two weeks. To enjoy, let the container sit at room temperature for five to ten minutes before scooping for optimal texture.
My neighbor, a notorious ice cream snob, took one bite of this chocolate peanut butter swirl and swore it was better than the stuff he buys at the gourmet parlor, which validated all those hours spent stirring custard.
Expert Tips for Flawless Freezing
-
Strain your custard base rigorously after cooking; this eliminates any solids and ensures the final ice cream is incredibly smooth and professional grade.
-
Always ensure your churning bowl is completely frozen solid, as slight thawing drastically reduces the efficiency and quality of the final frozen treat.
-
Do not over-churn the mixture; stop when it resembles soft-serve, as it continues to solidify and develop structure during the mandatory deep-freeze period.
Troubleshooting Texture and Flavor
Even the most seasoned home cooks sometimes run into challenges when dealing with frozen desserts. Ice cream requires a careful balance of liquids and solids to prevent that dreaded icy texture. If your final product resembles a block of ice more than creamy bliss, usually it means one of two things happened: either your initial base wasn’t chilled long enough, or the mixture had too much water content relative to the fat and sugar. Increasing the fat (by adding another tablespoon of heavy cream) or sugar can help lower the freezing point, ensuring a softer scoop.
Another common issue is flavor muddiness. If your chocolate seems flat, try adding a small amount of instant coffee granules to the warming milk. Coffee naturally enhances the depth of chocolate flavor without making the ice cream taste like coffee. Also, always use pure vanilla powder, as the imitation version can leave a distinct, artificial aftertaste that detracts from the richness we are trying to achieve.
Remember, making ice cream is as much an art as a science. Don’t be afraid to experiment slightly with the ratios to find the perfect level of intensity for your palate. Whether you prefer a stronger chocolate punch or a dominant nutty flavor, small adjustments to the cocoa or peanut butter ratio can make a big difference in this luscious homemade frozen dessert.
Frequently Asked Questions (FAQs) About Homemade Ice Cream
Can I use natural peanut butter instead of commercial creamy peanut butter?
While you certainly can, natural peanut butter that separates oil tends to seize up and become very brittle when frozen, making the swirl difficult to manage and resulting in a hard, chewy texture rather than soft ribbons.
Why is my ice cream icy?
Icy texture usually stems from insufficient chilling time of the custard base, low fat content, or the presence of too much air during churning. Ensure the base is icy cold before churning and always use high-fat dairy products.
Is tempering the egg yolks truly necessary?
Yes, tempering is crucial. It slowly raises the temperature of the egg yolks without scrambling them, allowing the eggs to act as a thickening agent and an emulsifier, which significantly contributes to the smooth, rich texture of the final custard.
How long does homemade ice cream typically last in the freezer?
For optimal flavor and texture, aim to consume this delicious Chocolate Peanut Butter Ice Cream within the first two weeks. After that, quality starts to degrade, and you risk freezer burn, even with proper storage.
A Final Word on Sweet Indulgence
There is nothing quite like the satisfaction of scooping a dessert you created from scratch, especially one as universally adored as this chocolate and peanut butter masterpiece. This recipe is a celebration of classic flavors executed with perfect technique. It guarantees a velvety smoothness and an intense flavor profile that will quickly become a fixture in your dessert rotation. Stop dreaming of ice cream and start churning! You deserve this glorious, cold, and decadent treat.
The Midnight Confession: Why This Recipe Exists
We’ve all been there. It’s 11:47 PM. The house is dark, and silence reigns… until that sneaky, insistent voice starts whispering, “Ice cream.” But not just any ice cream. You need the dynamic duo, the ultimate power couple of the frozen world: chocolate and peanut butter. My journey to creating the perfect homemade batch of Chocolate Peanut Butter Ice Cream started during one such desperate hour. My previous attempts were, shall we say, textural disasters—more akin to frozen concrete than creamy indulgence. I once tried a “healthy” version that tasted suspiciously like frozen mud. After many sleepless nights and countless ruined spoons, I finally cracked the code for a rich, velvety treat that perfectly balances the bittersweet cocoa with salty, nutty goodness. Forget those grainy store-bought pints; we are making magic tonight. This recipe is simple, requiring minimal fuss but delivering maximum flavor payoff. It’s the kind of recipe you’ll memorize and then use to impress everyone you know.
Ingredients for Ultimate Indulgence
The Creamy Base
- 2 cups Heavy Cream
- 1 cup Whole Milk
- 3/4 cup Granulated Sugar
- 1/4 cup Unsweetened Cocoa Powder (Dutch process preferred)
- 1 teaspoon Vanilla Powder
- Pinch of Salt
The Peanut Butter Swirl
- 1/2 cup Creamy Peanut Butter (natural style works best)
- 2 tablespoons Powdered Sugar
- 1 tablespoon Milk
Churning Up Happiness: The Step-by-Step Guide
Mixing the Chocolate Custard
First, whisk together the sugar, cocoa powder, and salt in a large bowl. Gradually incorporate the milk until the mixture is smooth and paste-like. This step prevents any unpleasant lumps from forming later. Next, slowly whisk in the heavy cream and vanilla powder. Ensure everything is thoroughly combined using a rubber spatula or whisk. You do not need a double boiler or complicated tempering process here; just thorough mixing for a no-cook base. Cover the bowl tightly and chill the mixture in the refrigerator for at least four hours, or preferably overnight. Chilling is the secret weapon for achieving maximum creaminess and preventing large ice crystals during the churning process.
The Peanut Butter Prep
While your base is chilling, prepare the swirl component. In a separate small bowl, combine the peanut butter, powdered sugar, and the tablespoon of milk. Whisk this mixture until it becomes soft and drizzle-able but still thick enough to hold its shape when frozen. We want it to be thick, like ribbons, not runny. If the mixture is too stiff, add milk slowly, half a teaspoon at a time, until it reaches the desired ribbons consistency. Set this aside at room temperature while you await the churning of the base mixture. Keeping the swirl slightly warm will help it layer better in the cold ice cream.
Churning and Swirling Mastery
Pour the chilled chocolate mixture directly into your ice cream maker, making sure to follow the manufacturer’s directions for operation. Churn the mixture until it thickens to the consistency of soft-serve, which usually takes between 20 to 30 minutes, depending on your specific machine. When the mixture finishes churning, transfer half of the soft ice cream to a large, freezer-safe container. Drizzle half of the prepared peanut butter mixture over the top layer. Use a knife or skewer to gently create swirls, moving through the mixture only a couple of times. Add the remaining ice cream, followed by the rest of the peanut butter drizzle. Do not over-swirl! We want distinct ribbons of peanut butter running through the finished product. Cover the container and freeze for at least six hours until it becomes perfectly firm.
Troubleshooting & Pro Tips
How to Achieve Peak Creaminess
If you find your homemade frozen desserts tend to be icy, here are a few tricks that the professionals use. Firstly, always make sure your machine’s freezer bowl is frozen solid, which usually requires a full 24 hours in a deep freeze. Secondly, chilling the base for an extended period (even 12 hours) ensures the mixture is as cold as possible before churning, resulting in smaller ice crystals and a noticeably smoother texture. For an extra creamy batch, you could also add a tablespoon of corn syrup or a tiny amount of pectin powder to the base before chilling; these ingredients interfere with crystal formation and dramatically improve the final mouthfeel of the frozen treat, keeping it scoopable longer.
Conclusion for Chocolate Peanut Butter Ice Cream
Crafting your own batch of this glorious frozen dessert is a truly rewarding experience, transforming simple ingredients into a masterpiece of texture and flavor. We started with a basic, quick-chill chocolate base and added that crucial, salty peanut butter ribbon to achieve the ultimate flavor balance. Remember the key techniques: chill the base thoroughly before churning, do not over-churn the mixture, and resist the urge to vigorously over-swirl the peanut butter through the base. This resulting scoopable luxury is far superior to anything you can purchase ready-made at the store. Go forth, embrace your midnight cravings without guilt, and enjoy the rich, creamy delight that is truly the best homemade Chocolate Peanut Butter Ice Cream you will ever make.
FAQs
How long does homemade Chocolate Peanut Butter Ice Cream last in the freezer?
When stored properly, this decadent frozen dessert generally maintains peak quality for about two weeks. To ensure longevity and prevent freezer burn, always use an airtight container and press a layer of plastic wrap directly onto the surface of the ice cream before sealing the lid with the top. While it is safe to eat for much longer, the texture and flavor of the homemade Chocolate Peanut Butter Ice Cream begin to degrade after the two-week mark due to increasing crystal formation. For the absolute best scooping experience, plan to enjoy your incredible creation within the first seven days of freezing it.
Can I make this recipe without an ice cream maker?
Yes, you absolutely can make this rich treat without a dedicated machine by using the widely popular “no-churn” method. To do this, whip two cups of cold heavy cream until you achieve stiff peaks. Separately, mix the chocolate base ingredients (milk, cocoa, sugar, vanilla) and then fold this base gently into the whipped cream, being careful not to deflate the air. Incorporate the peanut butter swirl at this stage, and then immediately transfer the entire mixture to a freezer-safe container. Freeze for a minimum of six hours. This easy technique incorporates air into the mixture, mimicking the aeration of a churner, resulting in a surprisingly smooth and creamy peanut butter chocolate swirl dessert, though it will be slightly denser than the churned version.
What is the best way to substitute the dairy ingredients in this recipe?
If you are looking for a dairy-free alternative for this rich frozen dessert, several excellent substitutions exist that work beautifully. You can successfully replace the heavy cream with full-fat canned coconut cream, which must be chilled overnight so you can scoop out only the thick cream solids, leaving the water behind. Substitute the regular milk with a creamy plant-based milk like oat milk or soy milk, both of which have a great consistency. Ensure that the cocoa powder and sugar quantities remain exactly the same for flavor balance. Using plant-based fats may slightly alter the final texture, sometimes requiring the addition of a small amount of stabilizer like guar gum powder to maintain the desired creamy consistency after the base has been frozen.
Why did my homemade Chocolate Peanut Butter Ice Cream turn out icy?
Icy texture is a common challenge in homemade frozen treats and usually stems from two main issues: insufficient chilling time or too high of a water content in the mixture. Always ensure that your chocolate base is extremely cold (refrigerated for at least four hours) before churning begins. If the base is warm, large ice crystals form quickly during freezing. Additionally, using a higher ratio of fat content, such as only heavy cream instead of whole milk, helps lower the mixture’s freezing point, yielding a vastly smoother final result. For future batches of this delicious Chocolate Peanut Butter Ice Cream, check that your freezer bowl is frozen completely solid and consider reducing the small amount of regular milk slightly if the problem continues to persist.
Leave a Comment