

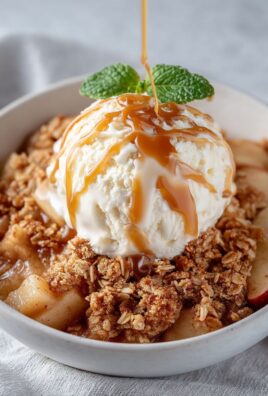
The scent of cinnamon and warm honey is the ultimate culinary hug, capable of curing even the most aggressive Monday morning blues. Forget the sad store-bought versions wrapped in plastic; it is time to unlock the secrets to creating truly exceptional sweet rolls right in your own kitchen.
Get ready for the definitive guide toHomemade Honey Buns: Easy Recipe for Delicious Treats. This isn’t just baking; it’s a commitment to buttery, sticky, irresistible happiness that makes life worth living.
- Achieve a perfect balance of fluffy interior and caramelized, sticky exterior, creating an unmatched textural experience.
- This simplified yeast dough process cuts down on complexity, making gourmet baking accessible even for absolute beginners.
- The golden-brown appearance and glistening honey glaze make these treats visually stunning, ready for any brunch spread.
- Enjoy these versatile buns warm from the oven for breakfast or drizzle them with extra glaze for an indulgent dessert.
The Pursuit of the Perfect Sticky Bun
There exists a great culinary mystery: why are so many people intimidated by yeast? I used to be one of them. For years, I treated yeast like a moody, high-maintenance celebrity—too delicate to handle, prone to sudden collapses, and requiring absolute silence. But the truth is, yeast is just a tiny, microscopic party animal looking for warmth, sugar, and a good time. Once you understand its basic needs, making enriched doughs like the one required forHomemade Honey Buns: Easy Recipe for Delicious Treatsbecomes less a challenge and more a joyful, dough-punching therapy session.
My first attempt at honey buns involved a tragic, dense, hockey puck incident. I killed the yeast with scalding milk. I failed to knead properly. The resulting treats were so hard, I genuinely believed I could have used them as doorstops. But failure, in the kitchen, is simply data collection. After much trial and error, I perfected a method that guarantees light, airy rolls saturated with a deeply caramelized honey glaze—no doorstops necessary. The key is patience during the proofing stage and understanding the crucial role of temperature.
Mastering the Magic of Yeast and Dough Structure
The foundation of any great honey bun lies in a rich, slightly sweet dough. We use a combination of milk, butter, and eggs to create an “enriched dough,” which yields that tender, velvety crumb we all crave. Unlike lean doughs (like baguette dough), enriched doughs require meticulous kneading because the fat and sugar inhibit gluten development. You need to persuade the gluten strands to form their strong, stretchy network without overworking the dough into a tough mess.
A good rule of thumb: Knead until the dough passes the “windowpane test.” If you can stretch a small piece of dough thin enough to see light through it without tearing, your gluten is perfectly developed. This structure allows the dough to capture the gases released by the yeast during proofing, resulting in those wonderfully high, fluffy swirls. If your kitchen is cold, find a warm spot for proofing—perhaps on top of a running oven, or inside an oven that has been warmed slightly and turned off. Aim for a doubling in size, not just a slight puff. This patience is the difference between a passable bun and one that sings.
The Art of Filling and Rolling
Once your dough is pillowy soft, the real fun begins: creating the swirl. Roll the dough out into a large rectangle—think roughly 1/4 inch thick. Don’t worry about measuring exactly; aim for consistency. Now comes the butter and cinnamon sugar mixture. Use softened butter, not melted butter. Melted butter leaks out and makes the dough difficult to handle; softened butter adheres perfectly, ensuring the cinnamon sugar stays trapped inside, caramelizing beautifully during the bake.
A generous sprinkling of cinnamon mixed with brown sugar and a touch of nutmeg creates that signature warmth. Roll the rectangle tightly, starting from the long edge. Imagine you are rolling up a highly important treasure map. You want tight coils, because loose rolls tend to unravel during baking and look sad. After rolling, use unflavored dental floss or a sharp, serrated knife to cut the log into 1-inch thick slices. Floss is preferred because it prevents squishing the perfect spiral shape you just created. Lay these beautiful spirals gently into your prepared pan, ready for their final rest.
The Sticky Secret: Creating the Signature Honey Glaze
What sets honey buns apart from mere cinnamon rolls? The irresistible, dripping, caramelized bottom that becomes the top upon serving. This glorious stickiness is the result of baking the dough directly on top of a thick, syrupy glaze. This glaze needs to be robust enough to handle the heat of the oven without scorching but liquid enough to coat the rolls thoroughly.
Crafting the Ultimate Caramelized Base
Our sticky base is remarkably straightforward but requires high-quality ingredients. We combine honey—the star of the show, of course—with butter and a touch of brown sugar and vanilla. Crucially, we add a small amount of water or milk to keep the glaze from hardening too fast during mixing. Heat this mixture gently until the sugar dissolves and the butter melts completely. Pour this glistening liquid directly into the bottom of your baking pan.
When you place the rolled buns onto this sticky layer for their second proof, they begin to absorb it. As the buns bake, this glaze bubbles and reduces, turning into a deep amber caramel that clings to the bottom of the dough. The process is transformative. When the buns come out of the oven, you immediately invert the entire pan. This movement ensures the sticky caramel, which was at the bottom, now cascades down the sides and pools over the top, achieving that shiny, professional bakery look.
Ingredients for Homemade Honey Buns: Easy Recipe for Delicious Treats
Here’s what you’ll need to make this delicious dish:
- All-Purpose FlourUse unbleached flour for the best structure; it provides the necessary gluten for a light, chewy bun.
- Active Dry YeastEnsure your yeast is fresh; dissolved in warm milk, it’s the engine that gives the buns their lift.
- Milk and EggsThese are essential for enriching the dough, adding tenderness, flavor, and that characteristic yellow hue.
- Unsalted ButterUsed both in the dough and the filling, butter provides richness and contributes significantly to the final texture and taste.
- Granulated Sugar and Brown SugarUsed to activate the yeast and sweeten the dough, while the brown sugar adds moisture and molasses notes to the filling.
- HoneyHigh-quality, floral honey is absolutely crucial for the sticky base, delivering the defining flavor profile of these treats.
- Cinnamon and NutmegThese spices provide the aromatic warmth that complements the sweetness of the honey and sugar filling perfectly.
- Vanilla PowderA splash of good vanilla enhances all the other flavors, giving the glaze depth and complexity.
The full ingredients list, including measurements, is provided in the recipe card directly below.
How to Make Homemade Honey Buns: Easy Recipe for Delicious Treats
Follow these simple steps to prepare this delicious dish:
Step 1: Activating the Yeast and Preparing the Dough
Warm the milk slightly (about 105°F to 115°F), ensuring it is not too hot to kill the yeast. Pour the milk into a large mixing bowl or stand mixer bowl, sprinkle the yeast and a teaspoon of sugar over it, and let it sit for 5 to 10 minutes until foamy. This confirms the yeast is active. Add the remaining sugar, softened butter, eggs, and salt to the yeast mixture. Gradually incorporate the flour, mixing on low speed until a shaggy dough forms. Increase the speed to medium-low and knead for 8 to 10 minutes until the dough is smooth, elastic, and pulls cleanly away from the sides of the bowl. Place the dough in a lightly oiled bowl, cover it, and allow it to proof in a warm place for 60 to 90 minutes, or until doubled in size.
Step 2: Preparing the Sticky Honey Glaze Base
While the dough proofs, prepare the sticky glaze. Preheat your oven to 375°F (190°C). In a small saucepan, combine the honey, 1/4 cup of the butter, brown sugar, and vanilla powder. Heat gently over low heat, stirring constantly until the butter is melted and the sugar is fully dissolved. Do not allow it to boil vigorously. Pour this sticky mixture evenly into the bottom of a 9×13 inch baking pan.
Step 3: Rolling, Filling, and Cutting the Buns
Once the dough has doubled, gently punch it down to release the air. Turn it out onto a lightly floured surface. Roll the dough into a large rectangle, approximately 18 inches by 12 inches and about 1/4 inch thick. In a small bowl, mix the remaining softened butter with cinnamon, granulated sugar, and nutmeg to create the filling. Spread this filling mixture evenly over the entire surface of the rolled dough, ensuring you leave a small 1/2-inch border bare along the top edge. Starting from the long bottom edge, roll the dough tightly into a log. Use unflavored dental floss or a sharp knife to cut the log into 12 equal slices.
Step 4: Second Proofing and Baking
Arrange the sliced buns cut-side up in the prepared baking pan, spaced slightly apart on top of the honey glaze mixture. Cover the pan loosely with plastic wrap or a clean kitchen towel and allow the buns to undergo their second proofing for 30 to 45 minutes. They should puff up and nearly touch one another. Bake the buns in the preheated oven for 20 to 25 minutes, or until they are golden brown on top and the glaze is bubbling furiously around the edges. Be vigilant to ensure the honey glaze does not burn.
Step 5: The Finishing Glaze and Inversion
While the buns are still hot, remove them from the oven. Allow them to rest in the pan for only 2 to 3 minutes—any longer and the sticky glaze will harden and fuse the buns to the pan. Place a serving platter or baking sheet upside down over the baking pan. Carefully and swiftly, invert the entire pan. Lift the pan away, allowing the sticky, caramelized glaze to flow down and coat the top of the buns entirely. If any glaze remains stuck to the bottom of the pan, gently scrape it onto the buns.
Transfer to plates and drizzle with the gooey caramel sauce for the perfect finishing touch. Serve immediately while they are delightfully warm and impossibly sticky.
Troubleshooting and Perfecting Your Bun Technique
Even seasoned bakers encounter hiccups when working with enriched doughs. The difference between a good bun and a mind-blowing one often comes down to attention to detail in three specific areas: temperature control, kneading precision, and proofing time.
Why Temperature Matters in Yeast Baking
Yeast is sensitive to temperature extremes. If your water or milk is too cold, the yeast will wake up sluggishly, leading to an extremely long proofing time and potentially a dense bun. If it’s too hot (above 130°F), you will kill the yeast instantly, resulting in zero rise. The ideal range for activating dry yeast is generally between 105°F and 115°F. Furthermore, the ambient temperature of your kitchen dramatically affects proofing. If it is winter, consider placing your dough near a sunlit window or warming a heat pad slightly and placing the bowl on top. Consistency in temperature ensures a consistent rise.
Preventing Dry or Tough Buns
Dry buns usually stem from one of two culprits: too much flour or overbaking. When measuring flour, always spoon it lightly into your measuring cup and level it off. Scooping directly can pack the flour, adding significantly more volume than intended, leading to a stiff dough that absorbs all the liquid. When kneading, stop as soon as the dough passes the windowpane test; continuing to knead past this point tightens the gluten too much, resulting in a tough texture.
For baking, watch the color, not just the timer. If the tops are browning too quickly, lightly tent the pan with aluminum foil to prevent scorching while allowing the center to finish cooking. The buns are done when they register an internal temperature of about 200°F (93°C). Immediately removing them from the oven prevents moisture loss and ensures they remain fluffy.
Serving Suggestions and Storage Tips
The beauty of theHomemade Honey Buns: Easy Recipe for Delicious Treatsis their versatility. While they are undoubtedly best enjoyed warm, mere minutes after the inversion, there are wonderful ways to maximize their deliciousness.
For breakfast or brunch, serve them alongside fresh fruit and strong coffee. The sweetness of the honey pairs exceptionally well with tart berries or sliced oranges. For a decadent dessert option, slightly warm the buns and serve them with a dollop of high-quality vanilla bean ice cream that melts into the sticky crevices.
If you happen to have leftovers—a highly unlikely scenario in my home—store them in an airtight container at room temperature for up to three days. To revive their sticky, fresh-baked quality, simply pop them into a microwave for 10-15 seconds or wrap them loosely in foil and reheat them in a 350°F (175°C) oven for about five minutes. This quick reheat will soften the glaze and refresh the dough, making them almost as good as day one. Never refrigerate yeast goods, as refrigeration causes them to stale rapidly.
Embrace the stickiness, enjoy the sweetness, and share the joy of these truly remarkable homemade treats.
I remember the era before I mastered the art of the perfect sweet breakfast treat. Sunday mornings used to be a chaotic dash to the bakery, elbows flying, just to snag a decent sticky bun. I needed a hero, and frankly, my grocery budget did too. That hero turned out to be yeast, flour, and a copious amount of honey, resulting in the creation of the best sweet delight imaginable. These buns are fluffy, outrageously decadent, and require only a fraction of the effort you’d expect from something so majestic. Forget waiting in line; your kitchen is about to become the most sought-after bakery in town. Get ready to dive into this incredible, comforting recipe.
The Accidental Discovery of Sunshine on a Plate

I originally tried making simple cinnamon rolls, but a catastrophic misunderstanding about the rising time led to dense, sad dough. Salvaging the disaster, I drenched the rolls in a sticky, hot honey glaze before baking. What emerged were surprisingly tender, deeply caramelized masterpieces—true sunshine on a plate, a delightful surprise.
The Ingredients: Your Path to Sticky Glory
Creating these sweet wonders requires two main phases: the fluffy dough and the mesmerizingly sticky glaze. Don’t be intimidated by yeast; think of it as a tiny, enthusiastic helper waiting to puff up your dreams. We use standard pantry items, making this one of the most accessible recipes for baking beginners.
For the Dough
- 1 cup warm milk (around 105–115°F)
- 2 teaspoons active dry yeast
- 1/4 cup granulated sugar, plus a pinch
- 1/4 cup melted unsalted butter (cooled slightly)
- 1 large egg, room temperature
- 1 teaspoon vanilla powder
- 1 teaspoon salt
- 3 to 3 1/2 cups all-purpose flour
For the Filling and Glaze
This is where the magic truly happens. We are ditching the usual cinnamon-sugar mix for a deeply flavorful, honey-centric experience.
- 1/2 cup unsalted butter, softened
- 1/2 cup packed light brown sugar
- 1/4 cup honey (high quality recommended)
- 1 teaspoon ground cinnamon
- 1/2 teaspoon ground cardamom (optional, but highly recommended for depth)
- 1/4 cup boiling water (for the glaze base)
- 1 cup powdered sugar (for the final drizzle, if desired)
Mixing and Proofing: The Foundation of Fluff
Getting the dough right is essential. It should be soft, slightly tacky, and completely pliable, promising that incredible, pull-apart texture we crave. Start by activating the yeast. In a large bowl or the bowl of a stand mixer, combine the warm milk, the pinch of sugar, and the active dry yeast. Let this sit for about five to ten minutes until it becomes foamy and smells slightly earthy. If it doesn’t foam, your yeast is likely expired, and you need to start fresh.
Once the yeast is bubbly, add the 1/4 cup of granulated sugar, melted butter, egg, vanilla powder, and salt. Mix thoroughly. Gradually incorporate the flour, starting with 3 cups. If using a stand mixer, use the dough hook attachment and mix on medium-low speed for five to seven minutes until the dough pulls cleanly away from the sides of the bowl. If mixing by hand, knead on a lightly floured surface for about ten minutes.
Place the dough in a lightly oiled bowl, turning once to coat. Cover the bowl tightly with plastic wrap or a clean kitchen towel. Allow the dough to proof in a warm place until it has doubled in size. This usually takes about one to one and a half hours, depending on the warmth of your kitchen. Patience is crucial here; don’t rush the rise!
Rolling, Filling, and Shaping Those Perfect Buns
Once doubled, gently punch the dough down—a satisfying moment, admittedly—and turn it out onto a lightly floured surface. Roll the dough into a large rectangle, approximately 18 inches long by 12 inches wide. Ensure the thickness is uniform to guarantee even baking.
Now, prepare the filling. In a small bowl, cream together the softened butter, brown sugar, honey, cinnamon, and cardamom until the mixture is smooth and easily spreadable. Spread this sweet, fragrant mixture evenly over the entire surface of the dough rectangle, leaving a small, half-inch margin along one of the long edges.
Starting with the long edge opposite the clean margin, tightly roll the dough into a cylinder. The tighter the roll, the better your spiral shape will be. Pinch the seam firmly to seal the cylinder completely. Using a sharp, un-serrated knife or, better yet, unflavored dental floss, cut the cylinder into 12 even slices, approximately 1 1/2 inches thick. Place these slices cut-side up into a well-greased 9×13 inch baking dish.
The Second Rise and the Sticky Base
Before the final bake, the buns need a second, shorter proofing period. Cover the baking dish loosely and let the buns rest for another 30 to 45 minutes. They should look noticeably puffy again, snuggling closely together in the pan. This ensures they stay incredibly tender after baking.
While they rest, preheat your oven to 375°F (190°C). If you want an extra-sticky bottom layer, you can briefly warm a tablespoon of honey and a tablespoon of butter and pour it over the bottom of the pan before placing the buns in for the final rise. Bake theHomemade Honey Buns: Easy Recipe for Delicious Treatsfor 25 to 30 minutes, or until they are golden brown on top and cooked through.
Once removed from the oven, let the buns cool in the pan for about five minutes. If you want a traditional sticky bun experience, invert the pan onto a serving platter while they are still warm, allowing the sticky base to drip gorgeously over the tops. Alternatively, you can let them cool slightly and drizzle with a simple powdered sugar icing made from powdered sugar and a few tablespoons of milk or water. Trust me, these are truly the best sweet breakfast treats.
Perfecting the Cooking Process
Achieving perfectHomemade Honey Buns: Easy Recipe for Delicious Treatsrelies on sequence. First, activate the yeast and mix the dough; second, use the first rise time to prepare the sticky filling completely. Finally, always ensure the dough has adequately rested after rolling before baking to guarantee maximum fluffiness and prevent dry results.
Add Your Touch
Customize these treats easily! Swap the cardamom for nutmeg or ginger for a spicier profile. You can also mix in chopped walnuts or pecans into the filling for satisfying crunch and texture. For a richer glaze, add a splash of vanilla to the boiling water mixture, intensifying the overall sweetness.
Storing & Reheating
Store cooled buns in an airtight container at room temperature for up to three days, though they rarely last that long. Reheat day-old buns in the microwave for 15 seconds for softness, or wrap them loosely in foil and warm them in a 300°F oven for ten minutes to restore that freshly baked texture.
Secrets to Honey Bun Success
If you aim for bakery-level results, sometimes a little insider knowledge makes all the difference. These tips will elevate your baking game and ensure every bite is perfection.
-
Ensure your milk temperature stays between 105°F and 115°F. If the milk is too hot, it will instantly kill the yeast, resulting in dense, flat buns, which nobody wants.
-
Use unflavored dental floss instead of a knife to slice the rolls. Floss provides a clean, non-smushing cut, preserving that beautiful spiral shape before the second rise.
-
For extra flavor depth, consider browning the butter used in the filling slightly before mixing it with the brown sugar and honey. This adds a subtle, nutty richness.
My Aunt Mildred, who claims she invented the concept of Sunday brunch, declared these honey buns her favorite breakfast item ever. She swore the secret was the quality of the honey, advising me to never skimp on the good stuff.
Why We Love Homemade Sweet Treats
There is a profound satisfaction that comes from pulling a tray of warm, fragrant baked goods from the oven. Unlike store-bought pastries that often taste vaguely artificial, these homemade versions burst with natural honey sweetness and rich butter flavor. They are the ideal accompaniment to a robust cup of coffee or a tall glass of cold milk, transforming any morning into a special occasion.
The beauty of theHomemade Honey Buns: Easy Recipe for Delicious Treatslies in their versatility. While they shine as a decadent breakfast, they also serve wonderfully as an afternoon snack or a comforting dessert. The preparation process itself is relaxing, a meditative practice of mixing, kneading, and waiting, rewarded by an aromatic kitchen and a spectacularly satisfying result.
Furthermore, mastering this specific yeast dough opens up a world of other baking possibilities. Once you feel comfortable handling enriched dough—dough containing fat, eggs, and sugar—you can easily transition to making dinner rolls, elevated braided breads, or even other sweet rolls. Think of this recipe not just as a one-off bake, but as a foundational course in becoming a confident home baker. The rich, golden exterior and the soft, pull-apart interior confirm that effort always pays off in the kitchen.
Troubleshooting Common Baking Woes
Even seasoned bakers encounter challenges. The most common issue with sweet rolls is dry dough. If your dough feels too stiff after adding the recommended amount of flour, stop adding more! The consistency should be slightly sticky, not dense like bread dough. A dry dough results in dry, crumbly buns that lack that signature pull-apart texture.
Another frequent concern is under-baking. If the tops look beautifully golden but the centers feel heavy or moist, they need more time. Covering the buns loosely with aluminum foil during the last ten minutes of baking prevents the tops from burning while allowing the interior to finish cooking thoroughly. Use an instant-read thermometer if you are truly concerned; the internal temperature should register around 200°F (93°C) when fully baked.
Finally, remember the importance of temperature control during the proofing stages. Yeast works best in a warm, draft-free environment. If your kitchen is cold, try placing the covered bowl inside a turned-off oven with the light on. The low heat generated by the bulb often provides the perfect cozy spot for the dough to rise properly and quickly, ensuring yourHomemade Honey Buns: Easy Recipe for Delicious Treatsreach maximum volume and tenderness.
Conclusion for Homemade Honey Buns: Easy Recipe for Delicious Treats
Baking homemade sweet rolls does not require a culinary degree; it simply requires good ingredients and a willingness to embrace the process. This recipe forHomemade Honey Buns: Easy Recipe for Delicious Treatsdelivers exceptional flavor and texture with surprising ease.
Remember the key steps: ensure your yeast is active, allow sufficient time for the two proofing stages, and don’t skimp on that rich, sticky filling. Whether you are treating your family to a weekend breakfast or looking for a comforting baked good to share, these honey buns promise warmth, sweetness, and that irresistible, nostalgic pull-apart softness. Go ahead, make your kitchen smell incredible and enjoy these truly delicious treats.

Leave a Comment