

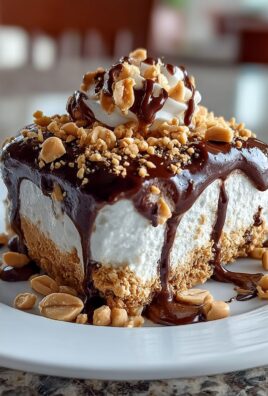
The moment the temperature hits ninety degrees, the kitchen transforms into a war zone against heat. Forget baking; what we desperately need is a dessert that fights back with ice-cold, creamy decadence. Behold the magical simplicity ofPeanut Butter Frozen Yogurt Bars.
This isn’t just dessert; it’s a nostalgic summer snack, marrying the salty richness of peanut butter with the tangy coolness of frozen yogurt, all wrapped up in a ridiculously easy no-bake package. Get ready for zero oven time and maximum chill.
- Effortlessly prepared with minimal dishes required, making cleanup nearly instantaneous even on the hottest day of the year.
- Features a dynamic flavor profile, combining the addictive salty nuttiness of peanut butter with a perfectly tart, refreshing finish.
- Visually appealing layers of crunchy crust and smooth, thick filling look impressive without demanding professional culinary skills.
- Extremely versatile, allowing easy substitutions for sweeteners and toppings to suit any dietary preference or craving you might have.
The Quest for the Ultimate No-Bake Indulgence
I once spent an entire summer trying to achieve the perfect “I just ate ice cream but feel zero guilt” dessert. This was back when my air conditioner sounded suspiciously like a dying wildebeest, and turning on the oven felt like committing a federal crime. I experimented with everything—sorbets that tasted like frozen fruit puree disappointment, elaborate chilled tortes that collapsed upon cutting, and gelatins that simply lacked personality.
The turning point came accidentally, as all great kitchen discoveries do. I had a massive container of plain Greek yogurt nearing its expiration date and a serious, profound craving for peanut butter. These two things, traditionally kept separate by the laws of flavor physics, collided in a moment of desperate creativity. The result was dense, tangy, impossibly creamy, and—most importantly—it required absolutely no heat. It was the birth of the chilled yogurt dessert that would save my sanity and conquer the sweltering afternoons.
What makes this recipe truly revolutionary is its texture. We aren’t making icy yogurt; we are creating something akin to firm, sliceable cheesecake, but with the nutritional profile of a much smarter snack. The secret lies in using thick Greek yogurt and giving it ample time to solidify. Plus, the crust. Oh, the crust. It’s a delightful, buttery, salty counterpoint that provides the necessary crunch against the smooth filling. You only need a few minutes of active prep time, making this the perfect recipe for those moments when you want maximum payoff for minimal effort. Forget complicated pastry techniques; if you can operate a food processor and a spatula, you are already halfway to glory. This bar is ideal for everything from a casual backyard barbecue to a desperate 3 PM snack session when the heat index is trying to break your spirit. It’s the kind of treat that makes you feel like a culinary genius, even though the heavy lifting is handled entirely by your freezer.
Ingredients for Peanut Butter Frozen Yogurt Bars
Here’s what you’ll need to make this delicious dish:
- Oatmeal CookiesThese form the crunchy base. Use plain, shortbread-style oatmeal cookies or graham crackers for a fantastic crumb structure.
- ButterMelted and unsalted butter acts as the binding agent for the crust, ensuring it holds together perfectly when frozen.
- Creamy Peanut ButterChoose a good quality, creamy variety. Natural peanut butter (the kind that separates) works best if you stir it well first, but classic creamy styles are also excellent for texture.
- Plain Greek YogurtThis is the backbone of the filling. Opt for full-fat Greek yogurt for maximum creaminess and structure; the higher fat content prevents it from becoming too icy.
- Powdered SugarUsed to sweeten the filling without adding grit. Powdered sugar dissolves seamlessly into the yogurt mixture, maintaining that silky texture.
- Vanilla PowderA splash enhances the overall flavor profile, complementing the nuttiness of the peanut butter and the tanginess of the yogurt.
- SaltJust a pinch in both the crust and the filling balances the sweetness and highlights the rich flavor of the peanut butter beautifully.
The full ingredients list, including measurements, is provided in the recipe card directly below.
How to Make Peanut Butter Frozen Yogurt Bars
Follow these simple steps to prepare this delicious dish:
-
Step 1: Prepare the Crust Base
In a food processor, pulse the oatmeal cookies until fine crumbs form. Add the melted butter and a pinch of salt, pulsing until the mixture resembles wet sand. Press this mixture firmly into the bottom of an 8×8-inch baking pan lined with parchment paper, allowing the paper to overhang on two sides for easy removal later. Place the pan in the freezer for at least 15 minutes to set the crust while you prepare the filling.
-
Step 2: Create the Peanut Butter Yogurt Filling
In a large bowl, combine the Greek yogurt, creamy peanut butter, powdered sugar, and vanilla powder. Use a hand mixer or a sturdy spatula to blend everything thoroughly until the mixture is completely smooth and uniform. Make sure there are no streaks of plain yogurt remaining. Taste and adjust the sweetness if necessary, adding a small amount more powdered sugar or a drizzle of honey.
-
Step 3: Layer and Smooth the Filling
Remove the chilled crust from the freezer. Carefully spoon the peanut butter yogurt filling over the crust. Use an offset spatula or the back of a spoon to spread the filling evenly across the entire surface. Ensure the layer is smooth and reaches all four corners for clean cuts later.
-
Step 4: Freeze Until Solid
Place the pan, uncovered, back into the freezer. Freeze for a minimum of 6 hours, but ideally overnight, to allow the bars to become completely solid and easy to slice. Rushing this step will result in a messy, soft bar, so patience is absolutely key here.
-
Step 5: Cut and Serve
Once frozen solid, use the parchment paper overhangs to lift the entire block out of the pan. Place the block on a sturdy cutting board. Use a sharp knife dipped in hot water and wiped dry to cut the block into 12 to 16 neat squares. Work quickly, as the bars will soften rapidly at room temperature. Transfer to plates and drizzle with melted chocolate or a sprinkle of crushed peanuts for the perfect finishing touch.
Mastering the Art of Chilled Desserts
Creating truly spectacular frozen treats, especially those incorporating dairy like these Peanut Butter Frozen Yogurt Bars, relies on managing temperature and moisture. When dealing with frozen yogurt, avoiding that unpleasant, hard-as-rock, icy texture is the main goal. This creamy quality is achieved primarily through fat content and using a low-water ingredient base. Greek yogurt, particularly the full-fat variety, is naturally lower in moisture and higher in protein and fat compared to regular yogurt, which makes it an ideal candidate for freezing. If you use non-fat yogurt, the resulting bar will be harder and icier, simply because there is more water present to form ice crystals.
Selecting the Right Pan for Easy Removal
Using the correct pan and preparation method ensures your frozen bars come out looking professional, not like a disaster zone. I highly recommend an 8×8-inch metal baking pan, as metal conducts cold rapidly, helping the bars set quickly and uniformly. The secret weapon, however, is parchment paper. Line the pan so that the paper extends up two opposite sides, creating ‘handles.’ When the bars are fully frozen, you simply grab these handles and lift the entire dessert out. This eliminates the struggle of trying to scrape the dessert out and guarantees clean, sharp edges. If you forget the parchment paper, you risk a sticky situation where the crust welds itself to the bottom of the pan forever.
Achieving the Ultimate Creamy Texture
To keep these bars from turning into a frozen brick, the key ingredients are the thick yogurt and the creamy peanut butter, which adds essential fats and solids. However, mixing technique matters too. When blending the filling, make sure to mix thoroughly but gently. Overmixing can sometimes incorporate too much air, which leads to tiny, unwanted ice crystals when frozen. Mix until smooth, then stop. Also, freezing time is non-negotiable. While four hours might make the bars solid, an overnight freeze (6-8 hours) allows the fat and protein structures to fully stabilize, resulting in a much smoother, denser, and more satisfying chew when you bite into one.
Another excellent trick for managing texture involves chilling the filling bowl and ingredients before mixing, especially on a very hot day. Starting with cold ingredients helps maintain a denser viscosity, which again, translates to fewer ice crystals forming during the long freeze. Remember, the texture should be creamy and dense, not fluffy or granular.
Flavor Variations and Customization
While the classic Peanut Butter Frozen Yogurt Bars are undeniably perfect, sometimes you need to shake things up. The beauty of this recipe is its adaptability; the basic yogurt base serves as a wonderful canvas for almost any flavor pairing you can imagine. These customizations not only keep the recipe fresh but also allow you to tailor the treat to specific seasonal flavors or personal preferences. I have successfully implemented several variations over the years, proving that this formula is nearly fail-safe.
Adding Depth with Chocolate Swirls
If you are a fan of the classic peanut butter and chocolate pairing, incorporating a chocolate swirl is remarkably simple and elevates the visual appeal instantly. After spreading the peanut butter yogurt mixture into the pan, melt about half a cup of semi-sweet chocolate chips with a teaspoon of neutral oil (like canola or coconut oil). Drizzle the melted chocolate across the top of the yogurt layer. Use a toothpick or the tip of a skewer to gently swirl the chocolate through the yogurt, creating delicate patterns. Do not over-swirl, or you will muddy the colors. Freeze as directed.
Seasonal Fruit Additions
For a refreshing, slightly fruity twist, consider adding fruit puree. Replace about a quarter cup of the powdered sugar with a concentrated fruit puree, such as mango or raspberry. Make sure the puree is thick and has minimal added water. Fold the puree gently into the yogurt filling just before pouring it over the crust. Alternatively, you can create a thin fruit layer. Spread half the yogurt filling, then gently dollop a thin layer of thick fruit jam or preserves, and cover with the remaining yogurt filling. Berries like blueberries or chopped strawberries work excellently when folded directly into the yogurt mixture, providing little bursts of tartness.
Alternative Crust Options
The oatmeal cookie crust is fantastic, but you have options if you prefer a different base. A simple crust made from finely crushed vanilla wafers or even crushed puffed rice cereal mixed with melted butter and a bit of honey works wonderfully. For a deeper flavor, try crushed pretzels mixed with brown sugar and butter; the salty-sweet combination against the tangy yogurt is irresistible.
Storing Your Chilled Peanut Butter Treat
These bars are designed for make-ahead convenience, making them ideal for portion control and spontaneous dessert cravings. Proper storage ensures they maintain their texture and fresh flavor for weeks. Once the bars are cut into squares, you must prevent them from sticking together or absorbing freezer odors, which can be surprisingly potent. Wrap each individual bar tightly in plastic wrap first. This extra layer of protection minimizes surface exposure to air and prevents freezer burn, which manifests as those unpleasant, hard, dry patches on the edges of frozen goods.
After wrapping them individually, place the bars in a large, freezer-safe, airtight container. Alternatively, a heavy-duty zip-top freezer bag works well; just make sure to push out as much air as possible before sealing. Stored correctly, these Peanut Butter Frozen Yogurt Bars will last happily in the freezer for up to three months. However, in my experience, they rarely survive past the first week.
When you are ready to enjoy one, simply pull it out of the freezer. For the best eating experience, let the bar sit at room temperature for about 5 to 10 minutes. This short thaw time softens the yogurt just enough to achieve that perfect, creamy, bite-friendly texture without becoming completely melted. If they are too hard, you miss out on the creamy decadence that makes this chilled dessert so special.
Welcome, fellow dessert enthusiasts, to the recipe that single-handedly saved my summer wardrobe budget. Why? Because these glorious bars provide the necessary sweet fix without requiring me to pawn any jewelry to pay for artisan ice cream. If your life currently consists of chasing toddlers, fighting deadlines, or simply existing in perpetual heat, you need a cool, creamy intervention. This intervention comes in the form of homemadePeanut Butter Frozen Yogurt Bars, a treat so effortlessly delicious, you’ll wonder why you ever bothered turning on your oven.
I affectionately call this the “Mid-Life Crisis Dessert.” You reach an age where you realize that standing over a stove for an hour in July is a voluntary form of self-torture, and yet, the craving for decadence remains strong. These bars are the perfect solution: mostly healthy, entirely delicious, and they require zero baking. We harness the magical tang of Greek yogurt and combine it with the earthy, comforting hug of peanut butter. The resulting bar is dense, smooth, and shockingly easy to prepare. Prepare your freezer space, because once you make one batch, you will be making three more immediately.
The Essential Tools for Frozen Glory
Before diving into the mixing bowl, ensure you have the right equipment. You don’t need fancy gadgets, but a sturdy 9×9 inch square baking pan is mandatory. Line it with parchment paper, leaving an overhang on two sides. This parchment sling is your secret weapon for lifting the frozen slab out intact, preventing a frozen yogurt disaster involving chisels and disappointment. Also, invest in decent mixing bowls and an electric mixer if you have one. While you can mix by hand, achieving that light, fluffy texture in the filling goes much faster with a bit of mechanical assistance.
Gathering Your Delicious Components
Success starts with high-quality ingredients. Because this recipe uses so few components, make sure each one sings. Opt for full-fat Greek yogurt for the best texture; it freezes beautifully and adds a richness that low-fat versions often lack. For the peanut butter, use the creamy kind and stir it well if it’s natural, ensuring no oily separation remains. This prevents the filling from becoming grainy when frozen. Finally, avoid any ingredients that are overly salty or sweetened; we control the sugar here, letting the natural flavors shine.
Ingredients List
- 1 ½ cups vanilla wafer crumbs (or graham crackers)
- ¼ cup melted unsalted butter or refined coconut oil
- 1 teaspoon brown sugar (optional, for the crust)
- 3 cups full-fat plain Greek yogurt
- 1 cup creamy peanut butter, plus 2 tablespoons for swirling
- ½ cup maple syrup (or agave nectar)
- 1 teaspoon pure vanilla powder
- ½ cup melted semi-sweet chocolate chips (or dark chocolate)
- ¼ cup chopped peanuts (for garnish)
The Crust: A Solid Foundation
Every great bar starts with a solid foundation, and this crust provides the necessary crunch to contrast the smooth filling. Combine the vanilla wafer crumbs, melted butter (or coconut oil), and the optional brown sugar in a medium bowl. Mix until the crumbs are thoroughly moistened, resembling wet sand. Press this mixture firmly and evenly into the bottom of your prepared 9×9 inch pan. We mean firmly! Use the flat bottom of a measuring cup to compact it thoroughly. Place this crust in the freezer for about 15 minutes while you prepare the filling. This crucial pre-freeze sets the base and stops it from mixing with the yogurt layer later on.
Crafting the Creamy Filling
Now for the main event. In a large mixing bowl, combine the Greek yogurt, 1 cup of creamy peanut butter, maple syrup, and vanilla powder. Use a hand mixer or stand mixer to beat these ingredients on medium speed until they are light, fluffy, and perfectly combined. This step takes about 2 to 3 minutes. The goal is aeration; incorporating air helps the mixture maintain a wonderfully smooth consistency even after freezing solid. Once smooth, pour the yogurt mixture over the chilled crust, spreading it carefully and evenly with a spatula.
The Signature Swirl and Finish
Melt the remaining 2 tablespoons of peanut butter and the ½ cup of chocolate chips separately. Drop dollops of the melted chocolate across the top of the yogurt layer, then follow with small dollops of the extra melted peanut butter. Using a skewer or a butter knife, gently drag it through the dollops to create a gorgeous, mesmerizing swirl pattern. This swirl doesn’t just look fancy; it ensures every bite of thePeanut Butter Frozen Yogurt Barscontains a concentrated burst of flavor. Sprinkle the top evenly with the chopped peanuts for textural contrast. Place the entire pan back into the freezer for a minimum of 6 hours, or ideally, overnight, ensuring they are completely firm before slicing.
The Accidental Discovery of Sunshine on a Plate

I was having a particularly dramatic meltdown one summer afternoon, convinced nothing cold and delicious could also be reasonably healthy. I mashed together leftover yogurt and peanut butter, threw it in the freezer, and boom! These gloriousPeanut Butter Frozen Yogurt Barsappeared, proving that sometimes, the best recipes come from sheer desperation and a craving for immediate satisfaction.
Perfecting the Cooking Process
Since we aren’t actually cooking, the key sequence is layering efficiency. Start by pressing the crust firmly, then freeze it briefly while you whip the filling until fluffy. Ensure the filling is spread evenly before adding your gorgeous chocolate swirl; this guarantees perfectly structuredPeanut Butter Frozen Yogurt Barsevery time.
Add Your Touch
If you prefer cashew butter over peanut butter, go for it—the texture remains sublime. Swap crushed pretzels for the standard vanilla wafers in the base for a delightful salty crunch. For a richer flavor, infuse the melted chocolate with a drop of pure vanilla powder before drizzling the bars for an extra layer of complexity.
Storing & Reheating
Store these bars tightly wrapped in an airtight container in the freezer for up to three months, though they never last that long in my house. To serve, let them sit at room temperature for just 5 minutes before cutting; this softens them slightly, making the bars easier to slice and infinitely more enjoyable to devour.
Expert Tips for Flawless Bars
-
Ensure your Greek yogurt is absolutely cold before mixing; warmer yogurt is harder to whip into that airy, smooth consistency needed for freezing.
-
The secret to a neat slice is using a large, sharp knife dipped in hot water between cuts; wipe the knife clean quickly before making the next cut.
-
If you use natural peanut butter, stabilize the oil separation by refrigerating the jar upside down overnight before measuring out your cup for the filling.
My sister once tried to hide a batch of thesePeanut Butter Frozen Yogurt Barsbehind a bag of frozen peas, claiming they were “diet property.” We all agreed the bars were too good for such solitary confinement and rescued them immediately.
Conclusion for Peanut Butter Frozen Yogurt Bars
These creamy, dreamyPeanut Butter Frozen Yogurt Barsoffer the perfect blend of indulgent flavor and guilt-free enjoyment, making them the ultimate freezer staple. Remember the key techniques: firmly pressed crust, fluffy yogurt filling, and a solid 6-hour freeze time. Whether you’re searching for a quick snack or a stunning, make-ahead dessert for a party, this recipe delivers on all fronts.
They are a testament to the fact that simple ingredients, handled correctly, can produce truly spectacular results. Ditch the complicated baking projects and embrace the bliss of these no-bake wonders. Go ahead, make a batch today—your freezer will thank you, and your future self will be thrilled when that 3 PM craving hits.
Leave a Comment