

Pineapple Heaven Cake
Pineapple Heaven Cake is a delightful dessert that transports you straight to a tropical paradise with every bite. This luscious cake combines the sweetness of ripe pineapples with a light, fluffy texture that melts in your mouth. Originating from the sunny shores of the Caribbean, this cake has become a beloved treat in many households, often served at celebrations and family gatherings. Its vibrant flavor and moist crumb make it a favorite among both young and old.
People adore Pineapple Heaven Cake not just for its taste, but also for its convenience. With simple ingredients and easy preparation, it’s a go-to recipe for those who want to impress guests without spending hours in the kitchen. The combination of pineapple and cream creates a heavenly experience that leaves everyone asking for seconds. Whether you’re hosting a summer barbecue or celebrating a special occasion, Pineapple Heaven Cake is sure to be the star of the dessert table.

Ingredients:
- 1 cup all-purpose flour
- 1 cup granulated sugar
- 1/2 cup unsalted butter, softened
- 1/2 cup crushed pineapple, drained
- 1/2 cup sour cream
- 3 large eggs
- 1 teaspoon vanilla extract
- 1 teaspoon baking powder
- 1/2 teaspoon baking soda
- 1/4 teaspoon salt
- 1 cup shredded coconut (optional)
- 1/2 cup chopped walnuts or pecans (optional)
- 1 cup powdered sugar (for frosting)
- 2 tablespoons milk (for frosting)
- 1 teaspoon vanilla extract (for frosting)
Preparing the Batter
- Preheat your oven to 350°F (175°C). Grease and flour a 9-inch round cake pan or line it with parchment paper for easy removal.
- In a large mixing bowl, cream together the softened butter and granulated sugar until the mixture is light and fluffy. This should take about 3-4 minutes using an electric mixer on medium speed.
- Add the eggs one at a time, mixing well after each addition. Make sure to scrape down the sides of the bowl to ensure everything is well combined.
- Stir in the vanilla extract and sour cream until fully incorporated.
- In a separate bowl, whisk together the all-purpose flour, baking powder, baking soda, and salt. Gradually add this dry mixture to the wet ingredients, mixing on low speed until just combined. Be careful not to overmix.
- Fold in the crushed pineapple, shredded coconut, and chopped nuts (if using) gently with a spatula until evenly distributed throughout the batter.
Baking the Cake
- Pour the batter into the prepared cake pan, smoothing the top with a spatula.
- Bake in the preheated oven for 30-35 minutes, or until a toothpick inserted into the center comes out clean. The edges should be lightly golden.
- Once baked, remove the cake from the oven and let it cool in the pan for about 10 minutes. Then, carefully transfer it to a wire rack to cool completely.
Preparing the Frosting
- In a medium bowl, combine the powdered sugar, milk, and vanilla extract. Use a whisk or an electric mixer to blend until smooth and creamy. If the frosting is too thick, add a little more milk, one teaspoon at a time, until you reach your desired consistency.
- Once the cake has completely cooled, you can frost it. If you want a more decorative look, you can slice the cake in half horizontally to create two layers and frost between the layers as well.
Assembling the Cake
- If you opted for a two-layer cake, place one layer on a serving plate. Spread a generous amount of frosting on top of the first layer.
- Carefully place the second layer on top of the frosted layer. Use the remaining frosting to cover the top and sides of the cake. You can use a spatula to create swirls or peaks for a more decorative finish.
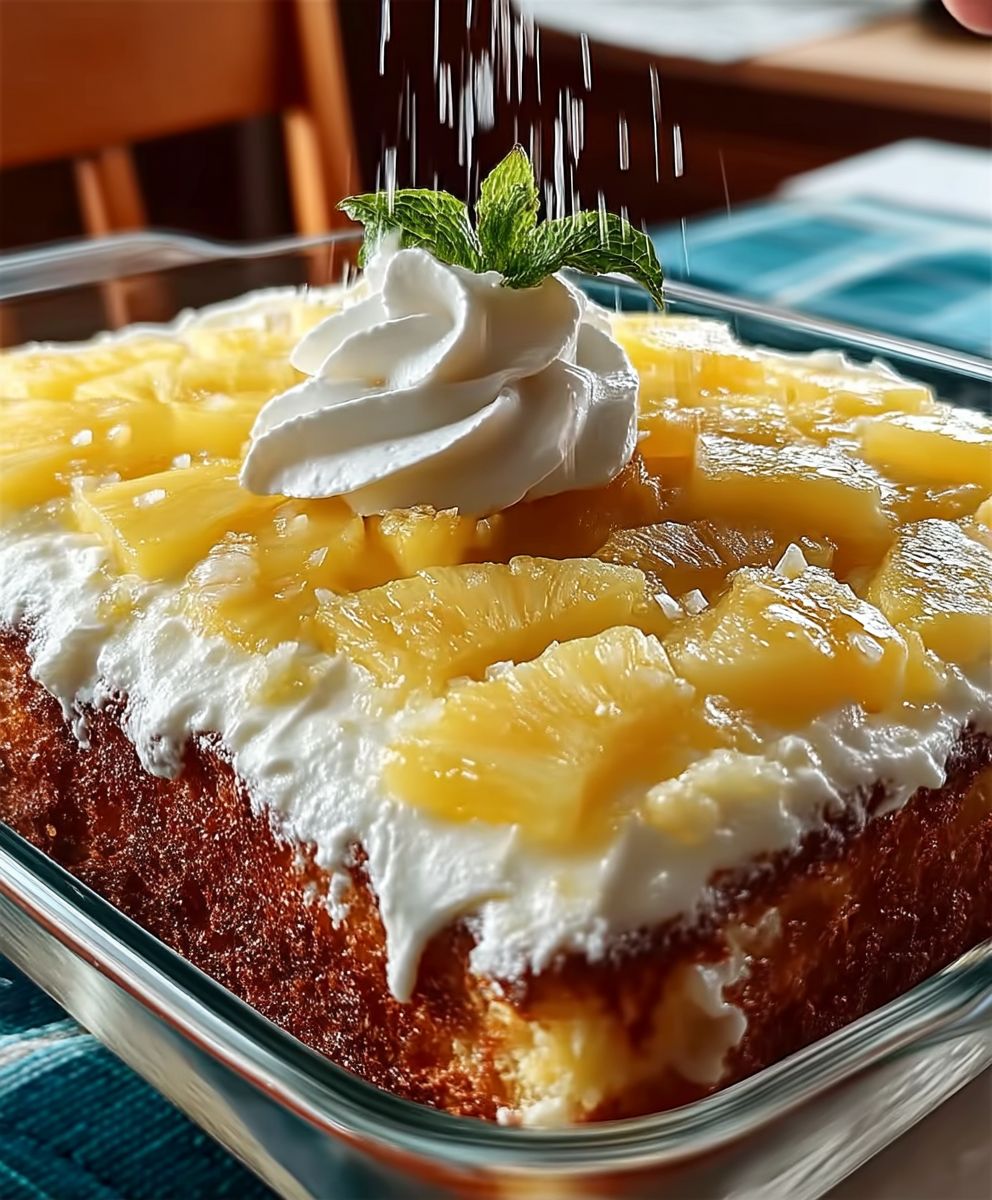
- If desired, sprinkle additional shredded coconut or chopped nuts on top of the frosted cake for added texture and visual appeal.
Serving Suggestions
- Slice the cake into wedges and serve it on individual plates. This cake pairs wonderfully with a scoop of vanilla ice cream or a dollop of whipped cream.
- For an extra tropical touch, consider garnishing each slice with a slice of fresh pineapple or a maraschino cherry.
- This cake is perfect for summer gatherings, birthday parties, or any occasion where you want to impress your guests with a delightful dessert.
Storage Tips
- If you have any leftovers, store the cake in an airtight container at room temperature for up to 3 days. If you live in a particularly warm climate, it’s best to refrigerate the cake to keep
Conclusion:
If you’re looking for a dessert that’s not only delicious but also brings a tropical twist to your table, then the Pineapple Heaven Cake is an absolute must-try! This cake is a delightful combination of moist layers, sweet pineapple, and creamy frosting that will transport your taste buds straight to paradise. The balance of flavors and textures makes it a standout dessert for any occasion, whether it’s a summer barbecue, a birthday celebration, or just a cozy family dinner.
One of the best things about the Pineapple Heaven Cake is its versatility. You can serve it as is, or you can elevate it with a few simple variations. For a fun twist, consider adding shredded coconut to the frosting for an extra layer of tropical flavor. If you’re feeling adventurous, you could even incorporate some crushed macadamia nuts into the batter for a delightful crunch. Pair it with a scoop of vanilla ice cream or a dollop of whipped cream to enhance the experience even further. You could also serve it with fresh fruit on the side, like slices of kiwi or strawberries, to add a refreshing contrast to the sweetness of the cake.
I encourage you to give this Pineapple Heaven Cake a try! It’s not just a dessert; it’s an experience that you’ll want to share with friends and family. Once you’ve baked it, I’d love to hear about your experience. Did you stick to the classic recipe, or did you try out one of the variations? How did your loved ones react to this tropical delight? Sharing your journey not only helps others discover this fantastic recipe but also creates a sense of community around our love for baking.
So, roll up your sleeves, gather your ingredients, and let’s make some Pineapple Heaven Cake magic happen in your kitchen! I promise you won’t regret it. This cake is sure to become a favorite in your household, and who knows, it might even become a tradition for special occasions. Don’t forget to snap a picture of your creation and share it with us! Happy baking!
Pineapple Heaven Cake: A Deliciously Moist Recipe You Must Try
This Pineapple Coconut Cake is a moist and flavorful dessert that features the tropical combination of crushed pineapple and shredded coconut, all topped with a creamy vanilla frosting. It's an ideal treat for summer gatherings and special occasions.
Ingredients
- 1 cup all-purpose flour
- 1 cup granulated sugar
- 1/2 cup unsalted butter, softened
- 1/2 cup crushed pineapple, drained
- 1/2 cup sour cream
- 3 large eggs
- 1 teaspoon vanilla extract
- 1 teaspoon baking powder
- 1/2 teaspoon baking soda
- 1/4 teaspoon salt
- 1 cup shredded coconut (optional)
- 1/2 cup chopped walnuts or pecans (optional)
- 1 cup powdered sugar (for frosting)
- 2 tablespoons milk (for frosting)
- 1 teaspoon vanilla extract (for frosting)
Instructions
- Preheat your oven to 350°F (175°C). Grease and flour a 9-inch round cake pan or line it with parchment paper for easy removal.
- In a large mixing bowl, cream together the softened butter and granulated sugar until the mixture is light and fluffy, about 3-4 minutes using an electric mixer on medium speed.
- Add the eggs one at a time, mixing well after each addition, and scrape down the sides of the bowl to ensure everything is well combined.
- Stir in the vanilla extract and sour cream until fully incorporated.
- In a separate bowl, whisk together the all-purpose flour, baking powder, baking soda, and salt. Gradually add this dry mixture to the wet ingredients, mixing on low speed until just combined, being careful not to overmix.
- Fold in the crushed pineapple, shredded coconut, and chopped nuts (if using) gently with a spatula until evenly distributed throughout the batter.
- Pour the batter into the prepared cake pan, smoothing the top with a spatula.
- Bake in the preheated oven for 30-35 minutes, or until a toothpick inserted into the center comes out clean and the edges are lightly golden.
- Once baked, remove the cake from the oven and let it cool in the pan for about 10 minutes. Then, carefully transfer it to a wire rack to cool completely.
- In a medium bowl, combine the powdered sugar, milk, and vanilla extract. Use a whisk or an electric mixer to blend until smooth and creamy, adding more milk if the frosting is too thick.
- Once the cake has completely cooled, frost it. For a decorative look, slice the cake in half horizontally to create two layers and frost between the layers as well.
- If you opted for a two-layer cake, place one layer on a serving plate and spread a generous amount of frosting on top of the first layer.
- Carefully place the second layer on top of the frosted layer and use the remaining frosting to cover the top and sides of the cake, creating swirls or peaks for a decorative finish.
- If desired, sprinkle additional shredded coconut or chopped nuts on top of the frosted cake for added texture and visual appeal.
- Slice the cake into wedges and serve it on individual plates, pairing it with a scoop of vanilla ice cream or a dollop of whipped cream.
- For an extra tropical touch, consider garnishing each slice with a slice of fresh pineapple or a maraschino cherry.
- If you have any leftovers, store the cake in an airtight container at room temperature for up to 3 days, or refrigerate it in warm climates.
- You can also freeze the cake for up to 3 months, wrapping it tightly in plastic wrap and then in aluminum foil before placing it in the freezer.
Notes
- If you have any leftovers, store the cake in an airtight container at room temperature for up to 3 days.
- If you live in a particularly warm climate, it’s best to refrigerate the cake to keep it fresh for a longer period.
- You can also freeze the cake for up to 3 months. Wrap it tightly in plastic wrap and then in aluminum foil before placing it in the freezer. Thaw in the refrigerator before serving.


Leave a Comment